Scoop 搭建 Windows 开发环境

Scoop 搭建 Windows 开发环境
狂犬主子Scoop 是一个 Windows 下基于 PowerShell 编写的的第三方包管理器,能够自动下载、解压、设置环境变量、添加 shim、持久化用户数据。
本文将使用 Scoop 来安装一些工具,简化开发环境搭建,让开发人员重装系统后可以更快配置环境。
本文提供的方法非特别说明无需特殊网络环境即可直接下载安装,并配置好国内镜像。
安装 Scoop
这里使用我们的特别版 Scoop,加入了一些特性,能够在国内环境自动切换镜像使用。如果你能访问 GitHub,推荐用原版。
打开 PowerShell,执行以下命令安装 Scoop。无需管理员权限。
1 | irm c.xrgzs.top/c/scoop | iex |
执行完上面的命令,你的电脑中已经安装好了 Git for Windows、7-Zip、Aria2、Gsudo,并添加了常用的仓库,可以基本满足使用。
TIPS:正常情况下 Scoop 安装完成的软件不会创建桌面快捷方式,可以在开始菜单的 Scoop Apps 文件夹中找到,将其拖到桌面即可。如果你希望自动创建快捷方式到桌面,可以使用桌面整理软件给
%APPDATA%\Microsoft\Windows\Start Menu\Programs\Scoop Apps映射到格子即可。但如果您使用我们提供的修改版,默认情况会同时创建快捷方式到桌面,可以取消,参考 README。
配置 Git
配置好 Git 以便能够拉取提交代码。如果不需要,可以跳过此步骤。
需要准备一个电子邮箱,且绑定到 GitHub / Gitee 等代码托管平台。
配置 Git 的用户名和邮箱:
1 | git config --global user.name "Your Name" git config --global user.email "youremail@example.com" |
(可选)配置客户端记住密码,避免每次都输入密码:
1 | # git config --global credential.helper store git config --global credential.helper manager |
(可选)配置默认文本编辑器(如果不想用默认的 Vim):
1 | git config --global core.editor "code --wait" |
查看配置信息:
1 | git config --list |
自动完成 GitHub 配置
如果你使用 GitHub,建议安装官方的 gh CLI,自动完成 GitHub 的配置:
1 | scoop install gh gh auth login gh auth setup-git |
配置 SSH 推拉代码
配置能够正确推拉如下格式的仓库:
1 | git clone git@gitee.com/user/repo.git |
生成 SSH 密钥:
1 | ssh-keygen -t ed25519 |
根据提示输入路径(回车即可)、密码(可为空)。
密钥和公钥默认存放到 %USERPROFILE%\.ssh 目录下,其中 id_ed25519 为私钥,id_ed25519.pub 为公钥。
显示 SSH 公钥:
1 | cat .ssh/id_ed25519.pub |
将 SSH 公钥的内容复制到 GitHub / Gitee 等平台的 SSH 管理中。
TIPS:如果你有服务器的话,可以将这个文件也上传到服务器上的 ~\.ssh\id_ed25519.pub,这样就可以实现 SSH 免密登录。
此时即可正常推拉代码,且提交具有身份验证,网页端会显示 Verified。
配置 HTTPS
配置能够正确推拉如下格式的仓库:
1 | git clone https://gitee.com/user/repo.git |
这种情况下,拉取/推送代码时可以配置登录信息。一般情况下到这里已经够用。
一些仓库要求强制 Verified,需要配置 GPG 签名验证身份。
配置 GPG 签名
生成 GPG 私钥:
1 | # Ensure gpg is installed gpg --version # Generate GPG key gpg --full-generate-key |
根据提示输入用户名、电子邮箱(要求同上),还有私钥的密码(请妥善保管,提交 commit 时要输入)。
生成 GPG 公钥:
1 | # Get your GPG key ID gpg --list-secret-keys --keyid-format=long # Generate GPG public key as ASCII armored output gpg --armor --export {key_id} |
将得到的 GPG 公钥复制到 GitHub / Gitee 等平台的 GPG 管理中。
配置 Git 的默认 GPG 签名:
1 | git config --global user.signingkey {key_id} # Use GPG signature for commit by default git config --global commit.gpgsign true git config --global tag.gpgSign true |
配置完成后每次 commit 时都会自动签名,并在网页端显示 Verified。
备份 GPG 密钥
这里我们的密钥保存到 ~/.gnupg ,如果重装系统可以备份这个目录。或者使用以下命令将设备的所有证书导出到一个设备:
1 | cd f: gpg --armor --export > mygpg.pub gpg --armor --export--secret-key > mygpg.sec |
需要注意的是,私钥一定不能丢失或外泄。为了以防万一,我们生成一份吊销证书,用以在特殊情况时吊销该密钥,当然吊销证书也应该妥善保管。
生成吊销证书:
1 | gpg --armor --gen-revoke > mygpg.rev |
(可选)发布 GPG 公钥
将公钥发布到密钥服务器上是不可逆行为,请谨慎操作
一些公钥服务器:
-
Ubuntu:keyserver.ubuntu.com
-
MIT:pgp.mit.edu
1 | gpg --keyserver keyserver.ubuntu.com --send-keys {key_id} |
(可选)导入平台 GPG 公钥
信任 GitHub 平台的默认公钥:
1 | curl https://github.com/web-flow.gpg | gpg --import # GitHub (web-flow commit signing) <noreply@github.com> gpg --sign-key 4AEE18F83AFDEB23 # GitHub <noreply@github.com> gpg --sign-key B5690EEEBB952194 |
信任 Gitee 平台的默认公钥:
1 | curl https://gitee.com/gitee.gpg | gpg --import # Gitee (Gitee web-flow commit signing.) <noreply@gitee.com> gpg --sign-key 173E9B9CA92EEF8F |
信任完成后即可在本地验证网页提交的签名。
1 | git log --show-signature |
(可选)安装 Gpg4win
安装Gpg4win的目的是替换git-for-windows默认的pinentry程序(用于输入密码),Gpg4win 会提供一个 pinentry-qt 程序来代替默认的 pinentry,主要是界面好看一点。其次,Gpg4win 提供了一个GUI 程序 Kleopatra,可以更方便地管理密钥和使用 GPG 进行签名、加密。
1 | scoop install extras/gpg4win # Test gpg --version |
然后我们需要修改 Git 的默认配置使其调用 Scoop 中安装的 Gpg4win:
1 | git config --global gpg.program "$(scoop which gpg | Resolve-Path)" |
这里有个坑,默认情况下 Gpg4win 的默认配置目录为 %APPDATA%\gnupg,并非 Git for Windows 默认的 ~\.gnupg,会导致我们打开 Kleopatra 看不到之前添加的密钥,根据文档,需要我们手动修改一下注册表或者环境变量:
1 | Set-ItemProperty -Path "HKCU:\Software\GNU\GnuPG" -Name 'HomeDir' -Value "$env:USERPROFILE\.gnupg" -Type String -Force # reg.exe add "HKCU\Software\GNU\GnuPG" /v HomeDir /t REG_SZ /d "$env:USERPROFILE\.gnupg" /f # [Environment]::SetEnvironmentVariable("GNUPGHOME", "$env:USERPROFILE\.gnupg", "User") |
此时执行 gpg --version 即可看到 Home 路径已被修改。如果 Kleopatra 已经运行了的话需要托盘退出重启一下才能看到更改。
配置终端
安装 Windows Terminal
Windows 11 已经默认安装,除非你是 LTSC 版本。
建议通过商店安装 Windows Terminal,并配置为默认终端。
亦可使用 Scoop 执行便携安装:
1 | scoop install extras/windows-terminal reg import "$(scoop prefix windows-terminal)\install-context.reg" |
必须要安装一个终端软件,不要使用系统内置的 conhost.exe,不然折磨死人。
升级到 PowerShell Core
由于 Windows 自带的 PowerShell 5.1 速度慢、兼容性差、功能少,且默认输出带 BOM,这里建议升级到跨平台的 PowerShell Core。在其他 Shell 中,Scoop 会自动切换为 PowerShell Core。
1 | # Install PowerShell Core Non-portable scoop install gsudo gsudo scoop install sdoog/pwsh-np scoop uninstall pwsh-np |
为了避免文件编码错误,我们重启到 PowerShell 完成后续的操作。
优化 Windows Terminal 配置
1 | # 获取 WT 配置路径 $wtSettingsPath = "$($(Get-Item $(Get-Command scoop.ps1).Path).Directory.Parent.FullName)\apps\windows-terminal\current\settings", "$env:LOCALAPPDATA\Packages\Microsoft.WindowsTerminal_8wekyb3d8bbwe\LocalState" | Where-Object { Test-Path "$_\settings.json" } | Select-Object -First 1 # 读取配置(使用 -AsHashtable 方便后续修改) $wtSettings = Get-Content "$wtSettingsPath\settings.json" | ConvertFrom-Json -AsHashtable # 设置启动居中 $wtSettings.centerOnLaunch = $True # 打开背景透明模糊效果 # $wtSettings.useAcrylicInTabRow = $True $wtSettings.profiles.defaults.opacity = 90 $wtSettings.profiles.defaults.useAcrylic = $True # 更改主题为 One Half Dark $wtSettings.profiles.defaults.colorScheme = "One Half Dark" # 应用 # $wtSettings | ConvertTo-Json -Depth 100 | Set-Content "$wtSettingsPath\settings.json" -Encoding UTF8 |
(可选)设置 CMD 为默认 Shell
由于 PowerShell 中部分体验和 CMD 不一致,已经习惯 DOS 命令的用户可能希望将 CMD 设为默认 Shell。
1 | # $wtSettings.profiles.defaultProfile = "{0caa0dad-35be-5f56-a8ff-afceeeaa6101}" $wtSettings.profiles.defaultProfile = (($wtSettings.profiles.list | Where-Object { $_.commandline -like "*cmd.exe" } | Select-Object -First 1 | ForEach-Object { $_.guid }) ?? "{0caa0dad-35be-5f56-a8ff-afceeeaa6101}") |
安装 Nerd Font
这里我们需要安装 Nerd Font 并将其设为默认,避免一些字符无法显示。个人喜欢使用 Cascadia Code。
Cascadia Code
1 | scoop install nerd-fonts/Cascadia-Code # Apply to Windows Terminal $wtSettings.profiles.defaults.font = @{ face = "Cascadia Code NF" } |
新装的字体需要重启 Windows Terminal 才能被使用,但先不着急重启。
添加 Git Bash 到 Windows Terminal
1 | $wtSettings.profiles.list += @{ commandline = "$(scoop prefix git)\bin\bash.exe -i -l" guid = "{2ece5bfe-50ed-5f3a-ab87-5cd4baafed2b}" icon = "$(scoop prefix git)\mingw64\share\git\git-for-windows.ico" name = "Git Bash" startingDirectory = "%USERPROFILE%" } |
添加 MSYS2 到 Windows Terminal
如果后面你想使用 MSYS2,可以添加到 Windows Terminal 中。
1 | # UCRT64 $wtSettings.profiles.list += @{ commandline = "$(scoop prefix msys2-cn)\msys2_shell.cmd -defterm -here -no-start -ucrt64" guid = "{17da3cac-b318-431e-8a3e-7fcdefe6d114}" icon = "$(scoop prefix msys2-cn)\ucrt64.ico" name = "UCRT64 / MSYS2" startingDirectory = "$(scoop prefix msys2-cn)\home\%USERNAME%" } # MSYS $wtSettings.profiles.list += @{ commandline = "$(scoop prefix msys2-cn)\msys2_shell.cmd -defterm -here -no-start -msys" guid = "{71160544-14d8-4194-af25-d05feeac7233}" icon = "$(scoop prefix msys2-cn)\msys2.ico" name = "MSYS / MSYS2" startingDirectory = "$(scoop prefix msys2-cn)\home\%USERNAME%" } # MinGW64 $wtSettings.profiles.list += @{ commandline = "$(scoop prefix msys2-cn)\msys2_shell.cmd -defterm -here -no-start -mingw64" guid = "{f0fc850d-4a2a-4bac-bf9c-96958e1d6246}" icon = "$(scoop prefix msys2-cn)\mingw64.ico" name = "MinGW64 / MSYS2" startingDirectory = "$(scoop prefix msys2-cn)\home\%USERNAME%" } # Clang64 $wtSettings.profiles.list += @{ commandline = "$(scoop prefix msys2-cn)\msys2_shell.cmd -defterm -here -no-start -clang64" guid = "{0b71a086-0652-4e48-b9d4-d4b674eab96a}" icon = "$(scoop prefix msys2-cn)\clang64.ico" name = "Clang64 / MSYS2" startingDirectory = "$(scoop prefix msys2-cn)\home\%USERNAME%" } |
保存配置
1 | $wtSettings | ConvertTo-Json -Depth 100 | Set-Content "$wtSettingsPath\settings.json" -Encoding UTF8 |
配置 Shell
PowerShell
加了美化和插件会拖慢 PowerShell 速度,如果您的设备性能较差或无法在 1s 内启动 PowerShell,建议删除美化和插件。
1 | # 确保 PowerShell 配置文件存在 if (-not (Test-Path -Path $PROFILE)) { New-Item -ItemType File -Path $PROFILE -Force } # 清空配置文件 "# $('=' * 50)`n# PowerShell Profile of $env:USERNAME`n# $('=' * 50)`n" | Out-File $PROFILE -Force |
由于 PSReadLine 新版 PowerShell 已经自带(虽然版本号稍有落后),因此我们只需要再安装一下对应的补全即可。
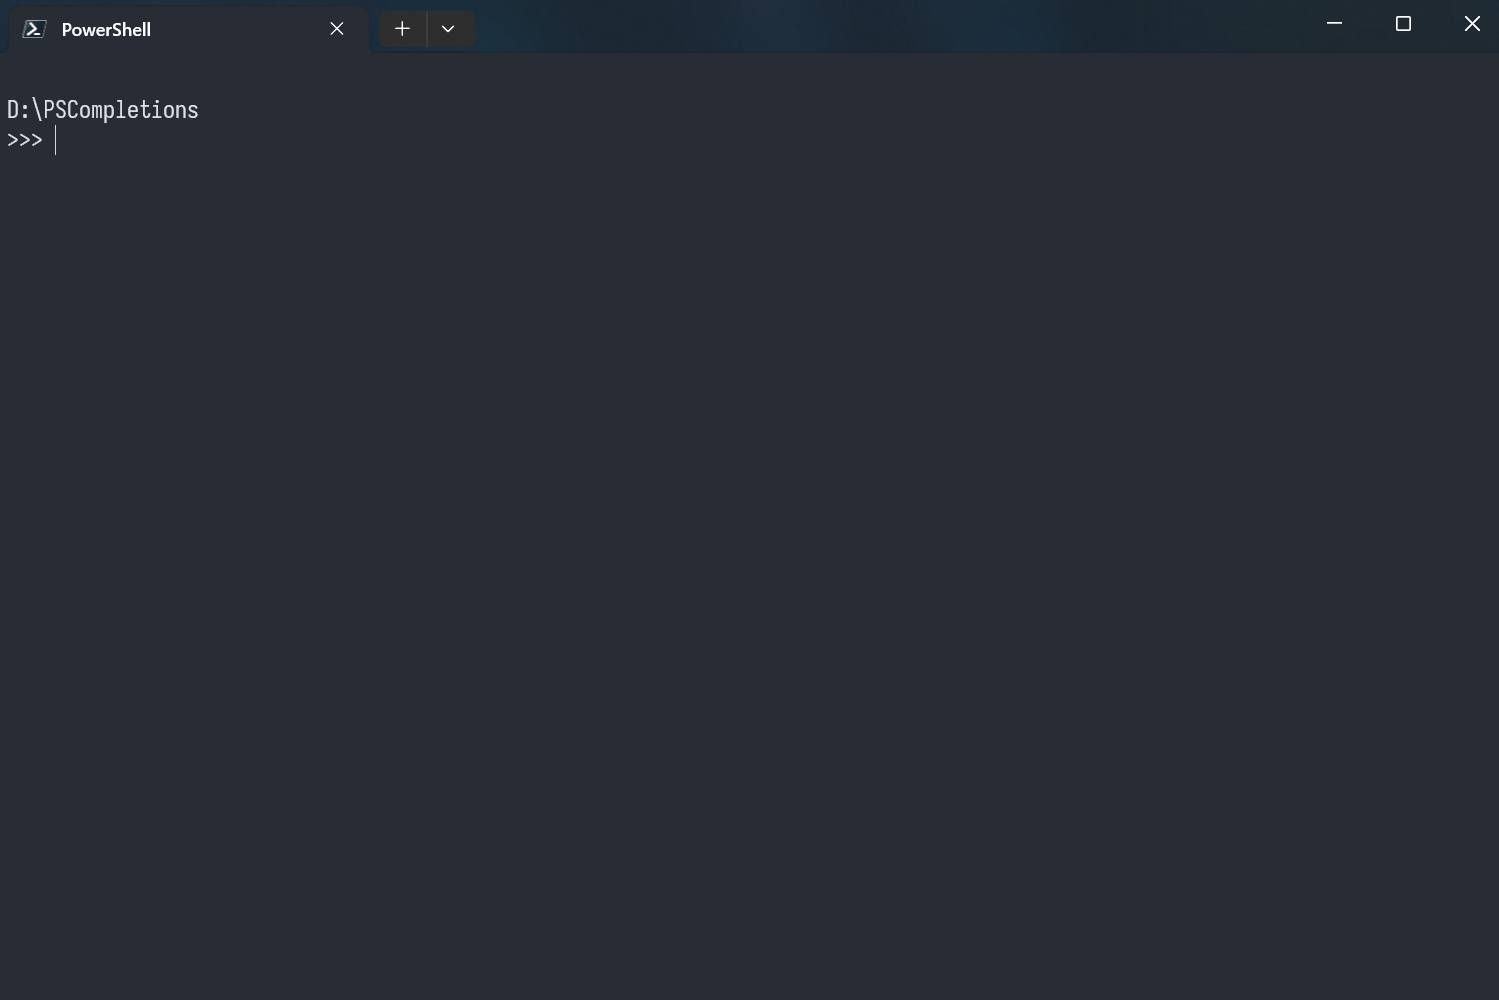
PSCompletions
(推荐,更新频繁,B站有号)
PSCompletions(psc)是一个补全管理器,为 PowerShell 带来更出色、更简便的 Tab 补全体验。
1 | # 从 PSGallery 安装: # Install-Module PSCompletions -Repository PSGallery -Force # 从 Scoop 安装(推荐,自动更新): # scoop bucket add abyss https://github.com/abgox/abyss # 作者仓库 # scoop install abyss/abgox.PSCompletions scoop install extras/pscompletions "# PSCompletions`nImport-Module PSCompletions`n" | Out-File $PROFILE -Append # 重载配置文件使其生效 . $PROFILE |
用法:按 Tab 键弹出命令补全窗口,按 F2 键切换为竖屏预测模式。
可以执行以下命令安装所有补全规则,支持提示中文:
1 | psc add * |
关闭自动更新提示(作者不推荐):
1 | # 关闭补全更新提示 psc config enable_completions_update 0 # 关闭模块更新提示(推荐,毕竟我们用 Scoop 管理更新) psc config enable_module_update 0 |
Carapace
Carapace 是一个命令补全库,以二进制形式提供。
1 | scoop install extras/carapace-bin "`n# Carapace`n`$env:CARAPACE_TOOLTIP = 1`ncarapace _carapace | Out-String | Invoke-Expression`n" | Out-File $PROFILE -Append |
argc-completions
(不推荐,很久未更新,建议只用上面的 Carapace)
argc-completions 是一个命令补全库,提供了 1000+ 命令补全。搭配 PSCompletions 可以覆盖常用命令。
- 仓库:https://github.com/sigoden/argc-completions (很久未更新)
1 | scoop install sdoog/argc # scoop install abyss/sigoden.Argc-completions "`n# argc-completions`n# Set-PSReadlineKeyHandler -Key Tab -Function MenuComplete`n`$argc_scripts = Get-ChildItem -File -Path (`$env:ARGC_COMPLETIONS_PATH -split ';') | ForEach-Object { `$_.BaseName }`n# argc --argc-completions powershell `$argc_scripts | Out-String | Invoke-Expression`n" | Out-File $PROFILE -Append "`n`$PSCompletions.argc_completions(`$argc_scripts)`n" | Out-File $PROFILE -Append |
Completion Predictor
Completion Predictor 是一个专为 PowerShell 设计的命令行自动补全插件,旨在增强 PSReadLine 模块的预测性智能感知功能。
仓库:https://github.com/PowerShell/CompletionPredictor (很久未更新)
1 | # Completion Predictor Install-Module CompletionPredictor -Repository PSGallery -Force "`n# Completion Predictor`nImport-Module CompletionPredictor`nSet-PSReadLineOption -PredictionSource HistoryAndPlugin`n" | Out-File $PROFILE -Append |
Scoop Completion
(不推荐,很久未更新,建议只用上面的 PSCompletions)
Scoop 自动补全。
1 | scoop install extras/scoop-completion "`n# Scoop Completion`nImport-Module `"$($(Get-Item $(Get-Command scoop.ps1).Path).Directory.Parent.FullName)\modules\scoop-completion`"`n" | Out-File $PROFILE -Append |
posh-git
(推荐使用 starship+psc 替代,避免拖慢速度)
posh-git 是一个 Git 补全和提示模块,能够在 PowerShell 中提供 Git 状态提示和命令补全功能。
- 仓库:https://github.com/dahlbyk/posh-git (很久未更新)

1 | # Git Completion and Tip scoop install extras/posh-git "`n# Git Completion and Tip`nImport-Module `"$($(Get-Item $(Get-Command scoop.ps1).Path).Directory.Parent.FullName)\modules\posh-git`"`n" | Out-File $PROFILE -Append |
其他
你可以添加其他的配置来自定义 shell 环境。
1 | # 使用Win11自带命令行编辑器 edit $PROFILE |
别名
这里提供几个个人发现可以替代原版命令的别名:
1 | # Customized alias Set-Alias -Name ping -Value Test-Connection Set-Alias -Name nslookup -Value Resolve-DnsName Set-Alias -Name ifconfig -Value Get-NetIPConfiguration Set-Alias -Name netstat -Value Get-NetTCPConnection Set-Alias -Name zip -Value Compress-Archive Set-Alias -Name unzip -Value Expand-Archive Set-Alias -Name which -Value Get-Command function .. { cd .. } function traceroute { Test-Connection -ComputerName $args[0] -Traceroute } function wget { aria2c -c -R --retry-wait=5 -x16 -s16 -j16 -k1M $args } |
自动补全
PowerShell 生态的自动补全比较复杂,很多工具都提供了自己的补全模块,安装后需要在 $PROFILE 中引入对应的模块才能生效。如果您的工具比较冷门,但支持completion powershell 这个命令规范,可用以下方法增加补全,但存在安全和性能问题问题:
1 | @("rclone") | ForEach-Object { Invoke-Expression "$_ completion powershell | Out-String | Invoke-Expression" } |
如果你引入了那么多的补全模块,会拖慢 PowerShell 的启动速度。因此最好实现按需加载。下面是踩了很多坑后总结的一个比较通用的按需加载动态补全的实现,原理是使用 Register-ArgumentCompleter 注册一个原生的参数补全器,当输入命令时才会执行对应命令的 completion powershell 来生成补全脚本并执行,从而实现按需加载。
1 | # Register dynamic completions # ===================================================================== # 1. uv (Rust/Clap 架构) - psc 已经内置了 uv 的补全,不用加 # ===================================================================== Register-ArgumentCompleter -Native -CommandName 'uv' -ScriptBlock { param($wordToComplete, $commandAst, $cursorPosition) [ScriptBlock]::Create( (uv generate-shell-completion powershell | Out-String).Trim() ).Invoke() return ( [System.Management.Automation.CommandCompletion]::CompleteInput( $commandAst.Extent.Text, $cursorPosition, $null ) ).CompletionMatches } # ===================================================================== # 2. rclone (Go/Cobra 架构) - psc 和 carapace 都没有 rclone 的补全,需要自己加 # ===================================================================== Register-ArgumentCompleter -Native -CommandName 'rclone' -ScriptBlock { param($wordToComplete, $commandAst, $cursorPosition) if (-not (Get-Variable '__rcloneCompleterBlock' -ErrorAction SilentlyContinue)) { rclone completion powershell | Out-String | Invoke-Expression } $completer = Get-Variable '__rcloneCompleterBlock' ` -ValueOnly ` -ErrorAction SilentlyContinue if ($completer) { & $completer $wordToComplete $commandAst $cursorPosition } } |
美化:Starship
Starship 是一个跨平台的 Shell 提示符,支持 PowerShell、CMD、Bash 等多种 Shell,可以显示 Git 状态、命令执行状态、时间等信息,并且支持高度自定义。
1 | scoop install starship # Add to profile "`n# Enable starship`nInvoke-Expression (&starship init powershell)`n" | Out-File $PROFILE -Append # Export preset starship preset plain-text-symbols > ~\.config\starship.toml |
效果演示:
美化:Oh My Posh
Oh My Posh 是一个适用于任何 shell 的提示主题引擎。
1 | # Install oh-my-posh scoop install oh-my-posh # Add to profile "# Enable oh-my-posh`noh-my-posh init pwsh --config '$(scoop prefix oh-my-posh)\themes\powerlevel10k_modern.omp.json' | Invoke-Expression`n" | Out-File $PROFILE -Append # Add to Windows PowerShell profile (Slow) # 'oh-my-posh init pwsh | Invoke-Expression' | Set-Content "$env:USERPROFILE\Documents\WindowsPowerShell\Microsoft.PowerShell_profile.ps1" |
可以到主题文档查看并选择一个合适的主题来替换掉上面的 powerlevel10k_modern.omp.json。
CMD
CMD 是 Windows 传统的命令行,功能简陋。
BusyBox
为了拓展 CMD 的命令,我们可以安装 BusyBox。
1 | scoop install busybox |
安装完成你就可以使用 ls、cat、grep、dd 等一些 Linux 命令了,虽然是精简版的,但有总比没有强。
注意安装 BusyBox 会覆盖掉一些已经安装的 shims,所以尽量提前安装。尤其是 Git Bash,如果被覆盖了可以通过以下命令恢复:
1 | scoop reset git |
Clink
我们可以安装 Clink 来优化 CMD 的体验。个人感觉优化下来比 PowerShell 好用。
1 | scoop install clink clink-completions clink autorun install @rem Disable auto update (use scoop) clink set clink.autoupdate off |
现在启动 CMD 就可以看到 Clink 的提示信息了。
如果想要配置一下外观,可以执行:
1 | @rem Make the startup message shorter clink set clink.logo short @rem Enable flex prompt (not necessary if you want to use oh-my-posh / starship) scoop install clink-flex-prompt flexprompt configure |
类似powerlevel10k,根据提示完成向导即可。
Bash
由于 Git Bash 自带 Bash 配置,且有性能问题,一般情况下无需优化。
X CMD
可以安装 X CMD,增强 Bash 的体验。
打开 Git Bash 执行以下命令即可。
1 | eval "$(curl https://get.x-cmd.com)" |
目前已经支持 PowerShell,可以使用以下命令自动配置:
1 | x pwsh --setup |
安装 AI Agent
2026 年是 AI 智能体爆发年,本文提供一些主流的 AI Agent 的安装方法。
CC-Switch
CC-Switch 是 Claude Code、Codex、Gemini CLI、OpenCode、OpenClaw 和 Hermes Agent 的全方位管理工具。
1 | scoop install extras/cc-switch |
Skills
Skills 是 Vercel 推出的开源 AI 智能体Skill技能目录,汇集 3.5 万+ GitHub 技能包,支持一键安装到 Claude、Cursor 等 27+ 主流 AI 编程工具。
Skills 依赖 NodeJS 环境 + NPM 包管理器,请按照下面的 配置 NodeJS 开发环境安装 NodeJS 后再安装 Skills:
1 | npx skills |
使用Skills,请确保你能访问 GitHub,不然 Agent 将无法获取文档。
可以添加提示词到你的 AGENTS.md / CLAUDE.md:
1 | ## 访问 GitHub 如果无法访问 GitHub,请在 https://github.com, https://raw.githubusercontent.com 前面加上 https://gh-proxy.com/ 来访问。 |
Claude Code
Claude Code 是 Anthropic 公司推出的 AI Agent,基于 Claude 模型,支持多模态输入输出,能够执行复杂的任务和代码生成。
由于该公司不提供中国地区(包括港澳台)访问,且没有适配国内镜像,因此无法直接使用官网的命令安装。
可以使用 Scoop 安装 Claude Code,绕过官网的访问限制,直接从 GitHub 仓库 安装:
1 | scoop install sdoog/claude-code |
建议使用 CC-Switch 来切换模型 API Key 配置。
Codex
Codex 是 OpenAI 公司推出的 AI Agent,用于 AI 编码。
- 官网:https://openai.com/codex
- 文档:https://developers.openai.com/codex
- 微软商店:https://get.microsoft.com/installer/download/9PLM9XGG6VKS
可以使用 Scoop 安装 Codex:
1 | scoop install codex |
建议使用 CC-Switch 来切换模型 API Key 配置。
OpenCode
OpenCode 是一个开源代理,帮助您在终端、IDE 或桌面端编写代码。
1 | scoop install opencode |
建议使用 CC-Switch 来切换模型 API Key 配置。
OpenClaw
OpenClaw 是一个能干活的 AI 助手。
这些 AI Agent 依赖 NodeJS 环境 + NPM 包管理器,请按照下面的 配置 NodeJS 开发环境安装 NodeJS 后再安装 OpenClaw:
1 | # Install OpenClaw npm i -g openclaw # Meet your lobster openclaw onboard |
Hermes Agent
Hermes Agent 是 Nous Research 出品的一个基于 Python 的 AI Agent,特色是支持记忆功能。
由于官方未适配 Windows,建议按照下面的配置 WSL2 + Docker 开发环境,使用 WSL2 来安装和使用。
Hermes Agent 依赖:
- uv
- Python 3.11
- Node.js 22
- ripgrep
- ffmpeg
- Git Bash
目前 Windows 版本依赖官方安装脚本,不方便使用 Scoop 安装。
配置 Visual Studio Code
Visual Studio Code 是微软出品的一款强大的编辑器,通过配置插件可以当作集成开发环境使用。前任产品为 GitHub Atom,都是采用了 Electron 技术实现跨平台。由于作为开源软件,存在一些衍生版,如 VSCodium、Cursor、Trae 等。
注意 Visual Studio(VS,紫色图标)和 Visual Studio Code(VSC,蓝色图标)的区别,前者是 IDE(类似于 macOS 上的 Xcode),后者是编辑器。如果你不搞 Windows C/C++、C# 开发,只需安装后者(VSC)。
建议从官网安装,以便获得更好的自动更新体验。
官网:https://code.visualstudio.com/
1 | scoop install vscode # 执行关联 reg import "$(scoop prefix vscode)\install-context.reg" reg import "$(scoop prefix vscode)\install-associations.reg" reg import "$(scoop prefix vscode)\install-github-integration.reg" |
优化配置
需要修改一下默认设置来优化编辑器体验,为了方便描述,这里使用 JSON。
打开设置(快捷键 Ctrl+,),点击右上角的 {} 图标进入 JSON 编辑模式,添加以下配置:
关闭自动更新
如果是从 Scoop 安装的,最好到设置里面关闭自动更新,如果是安装包安装,不建议关闭:
1 | "update.enableWindowsBackgroundUpdates": false "update.mode": "none" |
优化 Git 集成
使用编辑器修饰在编辑器中显示追溯信息:
1 | "git.blame.editorDecoration.enabled": true, |
更改字体
默认情况下,VS Code 会在 Windows 上使用宋体作为中文的 Fallback 显示方案,比较刺眼,通常需要修改为专业的编程字体方案。
附:Windows 下代码编辑器默认 CSS:
1 | font-family: Consolas, "Courier New", monospace; font-weight: normal; font-size: 14px; font-feature-settings: "liga" 0, "calt" 0; font-variation-settings: normal; |
如果你不清楚你适合什么字体,访问:https://www.codingfont.com/ 完成测试后自动得出结果。
改为你喜欢的编程字体(如 JetBrains Mono、Fira Code、Cascadia Code),微软雅黑作为Fallback。
1 | "editor.fontFamily": "'Cascadia Code', 'Microsoft YaHei UI', monospace", |
开启连字功能(可选,如果你不喜欢可以关闭,不适合所有人,尤其是初学者):
连字特性可以将一些常用的符号组合成更简洁和易读的形式,例如
!=会被替换为一个连字符≠。可以让代码更加美观,提高可读性。
1 | "editor.fontLigatures": true, |
安装扩展
你需要自行安装一下中文语言包和“亿”些插件 / 扩展。下面是个人必装的几个扩展,对于修改配置的场景比较适用。
其他的扩展可以根据开发类型的需要自行安装。一般VS Code会自动弹出提示:

安装扩展的注意事项:
- 不建议装太多无用的扩展。
- 注意验证发布者身份,多使用关键词搜索。
- 第三方扩展存在投毒风险,中毒与我无关。
Chinese (Simplified) (简体中文) Language Pack for Visual Studio Code
这个是 VS Code 的中文语言包,默认安装 VS Code 不带中文。
- 名称: Chinese (Simplified) (简体中文) Language Pack for Visual Studio Code
- ID: MS-CEINTL.vscode-language-pack-zh-hans
- 说明: Language pack extension for Chinese (Simplified)
- 发布者: Microsoft
- VS Marketplace 链接: https://marketplace.visualstudio.com/items?itemName=MS-CEINTL.vscode-language-pack-zh-hans
Python
写 Python 必装。
- 名称: Python
- ID:
ms-python.python - 说明: Python language support with extension access points for IntelliSense (Pylance), Debugging (Python Debugger), linting, formatting, refactoring, unit tests, and more.
- 发布者: Microsoft
- VS Marketplace 链接: https://marketplace.visualstudio.com/items?itemName=ms-python.python
Black Formatter
Python 的固定风格格式化插件。除了这个,还可以使用autopep8。
- 名称: Black Formatter
- ID:
ms-python.black-formatter - 说明: Formatting support for Python files using the Black formatter.
- 发布者: Microsoft
- VS Marketplace 链接: https://marketplace.visualstudio.com/items?itemName=ms-python.black-formatter
YAML
VS Code 对 YAML 支持不太好,经常改YAML配置的需要安装这个以提高编辑体验。
- 名称: YAML
- ID:
redhat.vscode-yaml - 说明: YAML Language Support by Red Hat, with built-in Kubernetes syntax support
- 发布者: Red Hat
- VS Marketplace 链接: https://marketplace.visualstudio.com/items?itemName=redhat.vscode-yaml
Even Better TOML
VS Code 对 TOML 支持不太好,经常改TOML配置的需要安装这个以提高编辑体验。
- 名称: Even Better TOML
- ID:
tamasfe.even-better-toml - 说明: Fully-featured TOML support
- 发布者: tamasfe
- VS Marketplace 链接: https://marketplace.visualstudio.com/items?itemName=tamasfe.even-better-toml
Rainbow CSV
高效查看 CSV 必备。
- 名称: Rainbow CSV
- ID:
mechatroner.rainbow-csv - 说明: Highlight CSV and TSV files, Run SQL-like queries
- 发布者: mechatroner
- VS Marketplace 链接: https://marketplace.visualstudio.com/items?itemName=mechatroner.rainbow-csv
Container Tools
使用 Docker 必备,直接在 VS Code 中管理容器。
- 名称: Container Tools
- ID:
ms-azuretools.vscode-containers - 说明: Makes it easy to create, manage, and debug containerized applications.
- 发布者: Microsoft
- VS Marketplace 链接: https://marketplace.visualstudio.com/items?itemName=ms-azuretools.vscode-containers
Prettier
强大的固定风格格式化工具(opinionated code formatter),开发前端项目必备。
- 名称: Prettier - Code formatter
- ID:
esbenp.prettier-vscode - 说明: Code formatter using prettier
- 发布者: Prettier
- VS Marketplace 链接: https://marketplace.visualstudio.com/items?itemName=esbenp.prettier-vscode
EditorConfig
用于统一项目文件编码。
- 名称: EditorConfig
- ID:
EditorConfig.EditorConfig - 说明: EditorConfig Support for Visual Studio Code
- 发布者: EditorConfig
- VS Marketplace 链接: https://marketplace.visualstudio.com/items?itemName=EditorConfig.EditorConfig
Live Server
启动带实时热重载功能的本地开发服务器,支持静态页面与动态页面。开发HTML必备。
- 名称: Live Server
- ID:
ritwickdey.LiveServer - 说明: Launch a development local Server with live reload feature for static & dynamic pages
- 发布者: Ritwick Dey
- VS Marketplace 链接: https://marketplace.visualstudio.com/items?itemName=ritwickdey.LiveServer
Material Icon Theme
Material Design 风格的增强图标集,相比VS Code自带,这个会针对文件夹名显示不同的图标,方便快速定位项目结构。
- 名称: Material Icon Theme
- ID:
PKief.material-icon-theme - 说明: Material Design Icons for Visual Studio Code
- 发布者: Philipp Kief
- VS Marketplace 链接: https://marketplace.visualstudio.com/items?itemName=PKief.material-icon-theme
Open in GitHub Button
方便在 GitHub 和 VS Code 直接切换,安装后会在VS Code状态栏出现一个GitHub小图标。
- 名称: Open in GitHub Button
- ID:
antfu.open-in-github-button - 说明: Add a button to go to the GitHub on the status bar
- 发布者: Anthony Fu
- VS Marketplace 链接: https://marketplace.visualstudio.com/items?itemName=antfu.open-in-github-button
Thunder Client
让 VS Code支持调试Rest API。
- 名称: Thunder Client
- ID:
rangav.vscode-thunder-client - 说明: Lightweight Rest API Client for VS Code
- 发布者: Thunder Client
- VS Marketplace 链接: https://marketplace.visualstudio.com/items?itemName=rangav.vscode-thunder-client
安装 NeoVim
Neovim 是一款现代、快速且功能丰富的编辑器,与 Vim 完全兼容。它支持插件、GUI、LSP、Lua 等。
1 | scoop install neovim |
Windows 配置文件位于 %LOCALAPPDATA%。
一般使用 Windows Terminal 即可满足编辑文件的需求,如果想要获得更好的炫酷的体验,可以安装 GUI,如 neovide:
1 | scoop install extras/neovide # 执行关联 reg import "$(scoop prefix neovide)\install-context.reg" |
默认情况下 Neovim 和 Vim 差不多,只是毛胚房,需要我们安装一些插件才能正常用于开发。折腾插件需要耗费大量精力,这里以 LazyVim 这个懒人包为例:
-
备份当前的 Neovim 文件:
1
2
3
4
5
6# required Move-Item "$env:LOCALAPPDATA\nvim" "$env:LOCALAPPDATA\nvim.bak" Remove-Item "$env:LOCALAPPDATA\nvim" -Recurse -Force # optional but recommended Move-Item "$env:LOCALAPPDATA\nvim-data" "$env:LOCALAPPDATA\nvim-data.bak" Remove-Item "$env:LOCALAPPDATA\nvim-data" -Recurse -Force
-
使用 Git 加速克隆 starter 配置,并换源(会报错
origin faild,不用管它):1
2
3
4git clone "https://gh.xrgzs.top/https://github.com/LazyVim/starter" "$env:LOCALAPPDATA\nvim" # replace git mirror in lua script # (Get-Content "$env:LOCALAPPDATA\nvim\lua\config\lazy.lua") -replace '(https://github.com)','https://gh.xrgzs.top/$1' | Set-Content "$env:LOCALAPPDATA\nvim\lua\config\lazy.lua"
-
LazyVim 支持直接给插件换源,参考以下diff,修改
$env:LOCALAPPDATA\nvim\lua\config\lazy.lua文件中的git.mirror配置项:1
2
3
4
5
6
7
8
9
10
11
12
13
14
15
16
17
18
19
20
21
22
23diff --git a/lazy.lua b/lazy.lua index 343d042..5a0254d 100644 --- a/lazy.lua +++ b/lazy.lua @@ -1,6 +1,7 @@ +local ghproxy = "https://gh.xrgzs.top/" -- 这里改成你的GitHub加速 local lazypath = vim.fn.stdpath("data") .. "/lazy/lazy.nvim" if not (vim.uv or vim.loop).fs_stat(lazypath) then - local lazyrepo = "https://github.com/folke/lazy.nvim.git" + local lazyrepo = ghproxy .. "https://github.com/folke/lazy.nvim.git" local out = vim.fn.system({ "git", "clone", "--filter=blob:none", "--branch=stable", lazyrepo, lazypath }) if vim.v.shell_error ~= 0 then vim.api.nvim_echo({ @@ -15,6 +16,9 @@ end vim.opt.rtp:prepend(lazypath) require("lazy").setup({ + git = { + url_format = ghproxy .. "https://github.com/%s.git", + }, spec = { -- add LazyVim and import its plugins { "LazyVim/LazyVim", import = "lazyvim.plugins" },
-
删除
.git文件夹,以便稍后将其添加到您自己的仓库:1
Remove-Item "$env:LOCALAPPDATA\nvim\.git" -Recurse -Force -
开始使用 Neovim,首次打开会卡一段时间,为正常现象。
1
nvim请参阅文件中有关如何自定义 LazyVim 的注释。建议安装后运行
:LazyHealth。这将加载所有插件并检查环境是否正常。
安装 JetBrains 全家桶
1 | # scoop install extras/idea scoop install extras/idea-ultimate scoop install extras/pycharm scoop install extras/phpstorm scoop install extras/goland scoop install extras/rider scoop install extras/clion scoop install extras/rustrover scoop install extras/webstorm scoop install extras/rubymine scoop install extras/datagrip # You know scoop install sdoog/jetbra # Or: irm ckey.run|iex |
安装 Typora
Markdown 编辑器。
1 | scoop install sdoog/typora |
此版本安装后会自动配置好关联。
配置 C/C++ 开发环境
这里不使用 Visual Studio(MSVC),而是配置 unix-like 的开发环境,原理是在 Windows 上提供一个 POSIX 环境,如 Cygwin、MSYS2 等。
最好先安装/更新一下 VC 运行库:
1 | scoop install extras/vcredist2022 scoop uninstall vcredist2022 |
方法一:Winlibs
与下一种方案不同的是,这种方法更加简单,直接使用 Scoop 管理开发工具链,不需要安装 MSYS2。缺点是丢失了包管理器,不过对于初学者来说足够了。
1 | scoop install mingw-winlibs # Test GCC gcc --version cmake --version |
现在 GCC 工具链已经安装好了,可以在 VSCode 等工具中使用了。
如需 LLVM 工具链,可以将上面的安装命令中的包名改为:versions/mingw-winlibs-llvm-ucrt
方法二:MSYS2
MSYS2 是一个适用于 Windows 的软件分发和构建平台,由 mintty、bash 命令行终端,git、subversion 等版本控制系统,tar、awk 等工具,autotools 等构建系统组成。可以理解为一个的“子系统”,让 Windows 也能享受 GNU 和开源工具,提供类似于 WSL 的功能。
我们可以在 MSYS2 里面安装 GCC、LLVM 等一些 C/C++ 开发工具链,以及一些使用对应工具链编译出来的二进制文件(不用你手动折腾编译),且可以通过 pacman (Arch Linux 也在用)这个包管理器进行方便的安装和管理。
MSYS2 的 unixy 工具直接基于 Cygwin,对原生 Windows API 支持更好。这里不直接使用 Cygwin 因为其提供的包比较少,且安装使用起来不太友好。
我们平时使用的 Git for Windows 就使用到了 MSYS2 的 MINGW64 环境。虽然 Git for Windows 提供了 MSYS2 的 MINGW64 环境,但 Git Bash 默认包含 Windows 的用户环境(不干净),默认家目录为 Windows 的用户目录,且没有内置 pacman 包管理器,仅用于跑 git。而 MSYS2 更倾向于提供“子系统”,设计上会有些不同,不会继承 Windows 的用户环境,家目录也与 Windows 的用户目录不同,不适合作为日常终端环境使用。
MSYS2 提供了 MSYS、UCRT64、CLANG64、MINGW64 等环境。关于这些环境的区别可以点击链接查看文档中的表格。这里使用 MSYS2 的 UCRT64 环境,与 MSVC 兼容性更好,且使用 gcc 工具链方便使用。如果你需要使用 llvm 工具链,可以使用 MSYS2 的 CLANG64 环境。
这里我们使用 scoop 安装 MSYS2 会将其安装到用户目录下,通常情况下我们会将 MSYS2 安装到 C:\msys64 目录下方便使用,需要注意一下可能和你看的教程不同。通过以下命令安装会自动配置好国内加速镜像,并安装 GCC 工具链和 CMake:
1 | scoop install dorado/msys2-cn # Add UCRT64 to User's PATH permanently [Environment]::SetEnvironmentVariable("PATH", $("$(scoop prefix msys2-cn)\ucrt64\bin;" + [Environment]::GetEnvironmentVariable("PATH", "User")), "User") # Refresh Current PATH $Env:Path = [System.Environment]::GetEnvironmentVariable('Path', 'Machine') + ';' + [System.Environment]::GetEnvironmentVariable('Path', 'User') # Install mingw-w64 GCC toolchain and CMake ucrt64 -c "pacman --noconfirm -S mingw-w64-ucrt-x86_64-gcc mingw-w64-ucrt-x86_64-cmake" # Test GCC gcc --version cmake --version |
此时 GCC 环境已经配置好,可以在 VSCode 等工具中使用了。
由于 MSYS2 能自己通过 pacman -Syu 升级,可以关闭 Scoop 的升级:
1 | scoop hold msys2-cn |
(可选)让 MSYS2 能够访问 Windows 的环境
默认情况下 MSYS2 无法访问 Windows 的环境,需要加上参数 -use-full-path 运行,或者设置环境变量:
1 | [Environment]::SetEnvironmentVariable("MSYS2_PATH_TYPE", "inherit", "User") |
设置完成后,家目录仍不互通。
(可选)让 Windows 能够访问 MSYS2 的环境
默认情况下 Windows 无法调用 MSYS2 中安装的工具,可以将它添加到 PATH:
1 | [Environment]::SetEnvironmentVariable("PATH", $([Environment]::GetEnvironmentVariable("PATH", "User") + ";$(scoop prefix msys2-cn)\usr\bin"), "User") |
危险:这种行为可能会造成系统不稳定,这里将其添加到最后尽量避免出现问题,家目录也不互通。一般加 UCRT64 解决编译问题就够了。
配置 Python 开发环境
2026年强烈建议使用 uv 安装管理 Python,建议直接跳转到安装 uv部分!
这里我们使用 scoop 安装最新版 Python(MSVC),并配置好国内镜像。
安装最新版 Python
1 | scoop install python # Allow applications and third-party installers to find python reg import "$(scoop prefix python)\install-pep-514.reg" |
更换 Pypi 镜像源
1 | # Use TUNA's mirror pip config set global.index-url https://mirrors.tuna.tsinghua.edu.cn/pypi/web/simple |
或者使用 chsrc:
1 | scoop install chsrc chsrc set python |
安装不同版本的 Python
1 | scoop install python38 reg import "$(scoop prefix python38)\install-pep-514.reg" |
切换 Python 版本
1 | scoop reset python python --version # Output: Python 3.14.5 scoop reset python38 python --version # Output: Python 3.8.10 |
安装 uv
uv 是一款全新的 Python 包和项目管理器,使用 Rust 开发,速度飞快。相当于 Python 的 NPM。
1 | scoop install uv # PyPi $Env:UV_DEFAULT_INDEX = "https://mirrors.tuna.tsinghua.edu.cn/pypi/web/simple" [Environment]::SetEnvironmentVariable("UV_DEFAULT_INDEX", $Env:UV_DEFAULT_INDEX, "User") # CPython $Env:UV_PYTHON_INSTALL_MIRROR = "https://mirror.nju.edu.cn/github-release/astral-sh/python-build-standalone" [Environment]::SetEnvironmentVariable("UV_PYTHON_INSTALL_MIRROR", $Env:UV_PYTHON_INSTALL_MIRROR, "User") uv python install 3.14 uv python update-shell # Restart your shell to apply changes |
安装 Miniconda
1 | scoop install extras/miniconda3 # Use TUNA's mirror 'channels: - defaults show_channel_urls: True envs_dirs: - ~/.conda/envs pkgs_dirs: - ~/.conda/pkgs default_channels: - https://mirrors.tuna.tsinghua.edu.cn/anaconda/pkgs/main - https://mirrors.tuna.tsinghua.edu.cn/anaconda/pkgs/r - https://mirrors.tuna.tsinghua.edu.cn/anaconda/pkgs/msys2 custom_channels: conda-forge: https://mirrors.tuna.tsinghua.edu.cn/anaconda/cloud pytorch: https://mirrors.tuna.tsinghua.edu.cn/anaconda/cloud auto: https://mirrors.tuna.tsinghua.edu.cn/anaconda/cloud ' | Set-Content -Path "$env:USERPROFILE\.condarc" |
配置 Node.js 开发环境
这里使用 Scoop 管理 Node.js 版本,一般推荐安装 nvm-windows 管理多版本的 Node.js。
安装最新版
1 | scoop install nodejs |
安装长期支持版本
1 | scoop install nodejs-lts |
npm 换源
使用 npm:
1 | npm config set registry https://registry.npmmirror.com |
或者使用 chsrc:
1 | scoop install chsrc chsrc set node |
安装 pnpm
使用 Scoop:
1 | scoop install pnpm |
或者使用 npm:
1 | npm install -g pnpm # corepack enable pnpm |
修复 Windows 上 npm run 默认使用 CMD
一些包会在 package.json 里面写 POSIX Shell,需要更换为 Bash (Git Bash) 以解决这个问题。
1 | npm config set script-shell bash |
配置 MySQL 开发环境
1 | scoop install mysql mysql-shell # Start MySQL mysqld --console # Launch MySQL Shell mysqlsh \connect root@127.0.0.1:3306 # Register MySQL as a service sudo mysqld --install MySQL --defaults-file="C:\Users\Admin\scoop\apps\mysql\current\my.ini" # Stop MySQL sc stop MySQL # Delete MySQL sc delete MySQL |
配置 PostgreSQL 开发环境
1 | scoop install postgresql |
配置 Java 开发环境
安装 OpenJDK
1 | scoop install java/openjdk # scoop install java/openjdk17 # Test Java java --version |
安装 Maven
1 | scoop install maven # Set M2_HOME $Env:M2_HOME = "$(scoop prefix maven)" [Environment]::SetEnvironmentVariable("M2_HOME", $Env:M2_HOME, "User") |
Maven 换源
1 | # Use NJU mirror '<?xml version="1.0" encoding="UTF-8"?> <settings xmlns="http://maven.apache.org/SETTINGS/1.2.0" xmlns:xsi="http://www.w3.org/2001/XMLSchema-instance" xsi:schemaLocation="http://maven.apache.org/SETTINGS/1.2.0 https://maven.apache.org/xsd/settings-1.2.0.xsd"> <mirrors> <mirror> <id>nju_mirror</id> <mirrorOf>*</mirrorOf> <url>https://repo.nju.edu.cn/maven/</url> </mirror> </mirrors> </settings> ' | Set-Content -Path "$Env:M2_HOME\conf\settings.xml" # Test Maven mvn --version mvn help:effective-settings |
安装 Gradle
1 | scoop install gradle # Set GRADLE_HOME $Env:GRADLE_HOME = "$(scoop prefix gradle)" [Environment]::SetEnvironmentVariable("GRADLE_HOME", $Env:GRADLE_HOME, "User") |
Gradle 换源
1 | # Use NJU mirror @" allprojects { buildscript { repositories { def NJU_REPOSITORY_URL = 'https://repo.nju.edu.cn/maven/' all { ArtifactRepository repo -> if (repo instanceof MavenArtifactRepository) { def url = repo.url.toString() if (url.startsWith('https://repo1.maven.org/maven2')) { project.logger.lifecycle "Repository `${repo.url} replaced by `$NJU_REPOSITORY_URL." remove repo } if (url.startsWith('https://jcenter.bintray.com/')) { project.logger.lifecycle "Repository `${repo.url} deleted." remove repo } if (url.startsWith('https://dl.google.com/dl/android/maven2/')) { project.logger.lifecycle "Repository `${repo.url} deleted." remove repo } if (url.contains('plugins.gradle.org/m2')) { project.logger.lifecycle "Repository `${repo.url} deleted." remove repo } } } maven { url NJU_REPOSITORY_URL } mavenLocal() } } repositories { def NJU_REPOSITORY_URL = 'https://repo.nju.edu.cn/maven/' all { ArtifactRepository repo -> if (repo instanceof MavenArtifactRepository) { def url = repo.url.toString() if (url.startsWith('https://repo1.maven.org/maven2')) { project.logger.lifecycle "Repository `${repo.url} replaced by `$NJU_REPOSITORY_URL." remove repo } if (url.startsWith('https://jcenter.bintray.com/')) { project.logger.lifecycle "Repository `${repo.url} deleted." remove repo } if (url.startsWith('https://dl.google.com/dl/android/maven2/')) { project.logger.lifecycle "Repository `${repo.url} deleted." remove repo } if (url.contains('plugins.gradle.org/m2')) { project.logger.lifecycle "Repository `${repo.url} deleted." remove repo } } } maven { url NJU_REPOSITORY_URL } mavenLocal() } } "@ | Set-Content -Path "$(scoop prefix gradle)\init.d\init.gradle" # Test Gradle gradle --version |
安装 Tomcat
1 | scoop install tomcat # CATALINA_HOME and CATALINA_BASE has been set. |
配置 Android 开发环境
安装 Android Studio:
1 | scoop install extras/android-studio |
安装 Android 命令行工具(可选)
适合于 C 盘够大或者 Scoop 安装到 D 盘的情况。否则建议使用下一种方式。
1 | scoop install android-clt |
需要注意 Scoop 会自动设置 ANDROID_HOME(Android SDK 目录)环境变量,请在 Android Studio 内确认 File | Settings | Languages & Frameworks | Android SDK -> Android SDK Location 为执行 scoop prefix android-clt 后显示的路径。配置不当会造成安卓虚拟机无法启动。
之后 Android SDK 将安装到 Scoop 目录且被 Scoop 持久化。
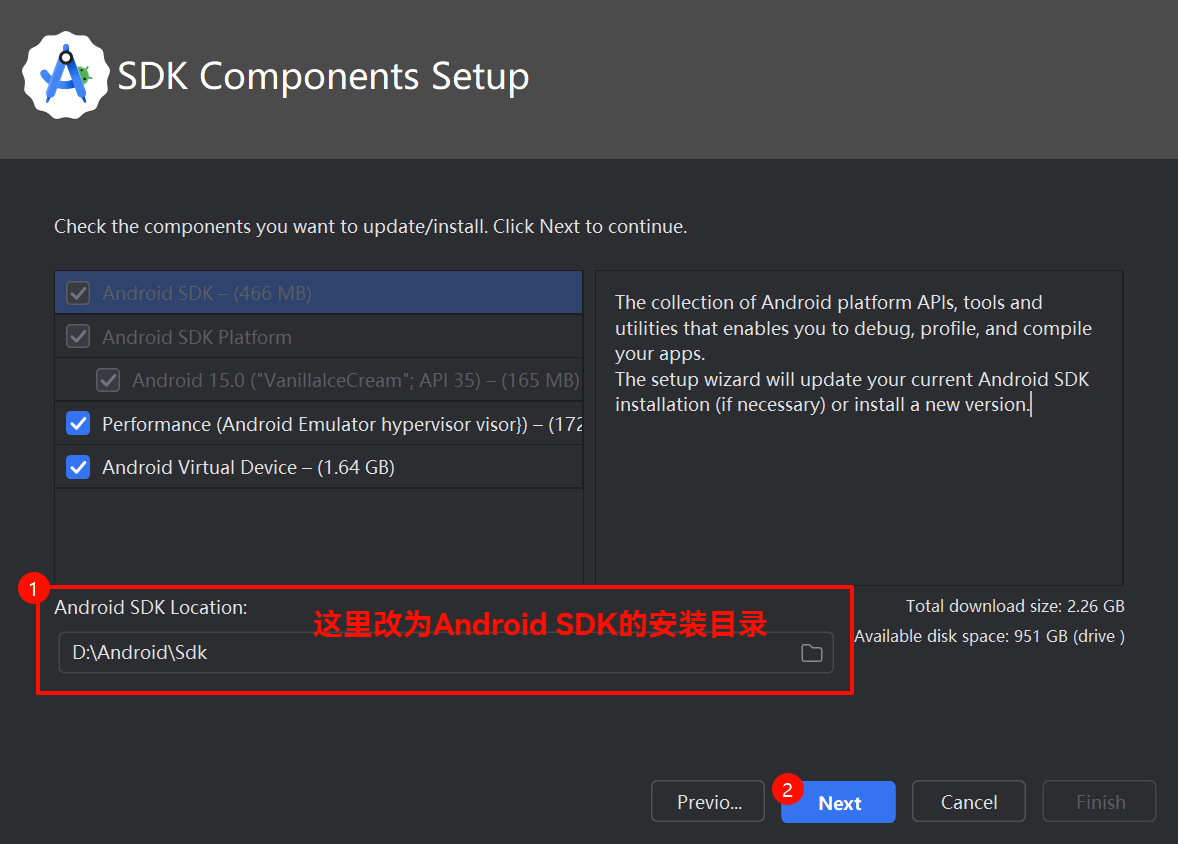
更改 Android SDK 目录
默认为 %LocalAppData%\Android\Sdk,由于 Android SDK 体积较大,我们可能需要将其存放到其它分区。
https://developer.android.com/tools/variables
1 | # Set ANDROID_HOME $Env:ANDROID_HOME = "D:\Android\Sdk" [Environment]::SetEnvironmentVariable("ANDROID_HOME", $Env:ANDROID_HOME, "User") mkdir $Env:ANDROID_HOME |
打开 Android Studio 安装 Android SDK。注意 Android Studio 不会自动读取环境变量,需要自行设置安装目录。安装目录选择错误可能会导致安卓虚拟机无法使用。
之后使用以下命令添加到 PATH:
1 | [Environment]::SetEnvironmentVariable("PATH", "$Env:ANDROID_HOME\bin;$Env:ANDROID_HOME\tools\bin;$Env:ANDROID_HOME\platform-tools;" + [Environment]::GetEnvironmentVariable("PATH", "User"), "User") # Refresh Current PATH $Env:Path = [System.Environment]::GetEnvironmentVariable('Path', 'Machine') + ';' + [System.Environment]::GetEnvironmentVariable('Path', 'User') adb.exe --version |
更改 Android SDK 用户目录
默认为 ~\.android,此目录可能会存放安卓虚拟机的镜像、ADB 密钥、配置文件,我们可能需要将其存放到其它分区。
1 | # Set ANDROID_USER_HOME $Env:ANDROID_USER_HOME = "D:\Android\Sdk\.android" [Environment]::SetEnvironmentVariable("ANDROID_USER_HOME", $Env:ANDROID_USER_HOME, "User") mkdir $Env:ANDROID_USER_HOME |
仅更改 Android AVD 目录
默认为 $ANDROID_EMULATOR_HOME\avd【默认为 $ANDROID_USER_HOME\avd(默认为 ~\.android\avd)】,此目录会存放安卓虚拟机的镜像文件,我们可能需要将其存放到其它分区。
1 | # Set ANDROID_EMULATOR_HOME $Env:ANDROID_EMULATOR_HOME = "D:\Android\Sdk\.android\avd" [Environment]::SetEnvironmentVariable("ANDROID_EMULATOR_HOME", $Env:ANDROID_EMULATOR_HOME, "User") mkdir $Env:ANDROID_EMULATOR_HOME |
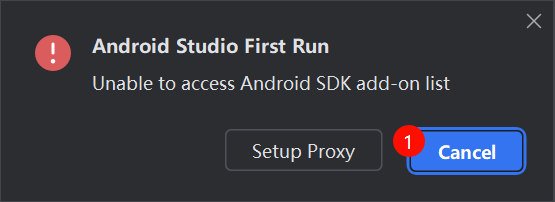
安装 Android SDK
需要确保能够访问 https://dl.google.com (浏览器访问出现 404. That’s an error. That’s all we know. 为正常现象,正常情况为国内 IP 可以裸连)
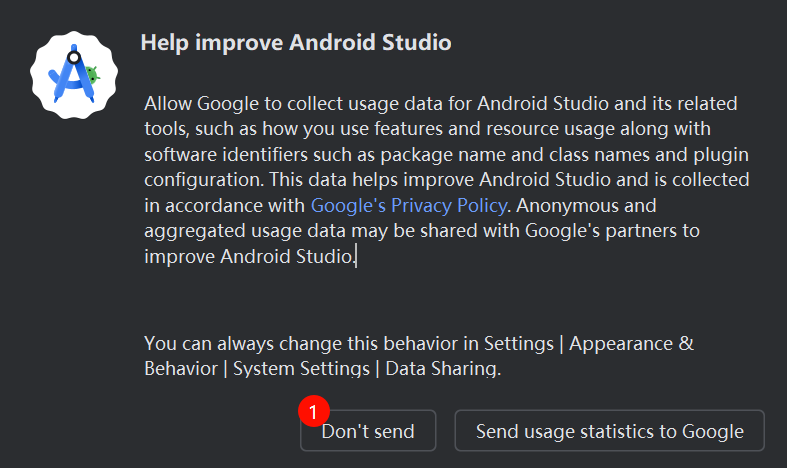
运行 Android Studio
1 | . "$(scoop prefix android-studio)\bin\studio64.exe" |
拒绝收集隐私信息
一般无需配置代理
自定义安装
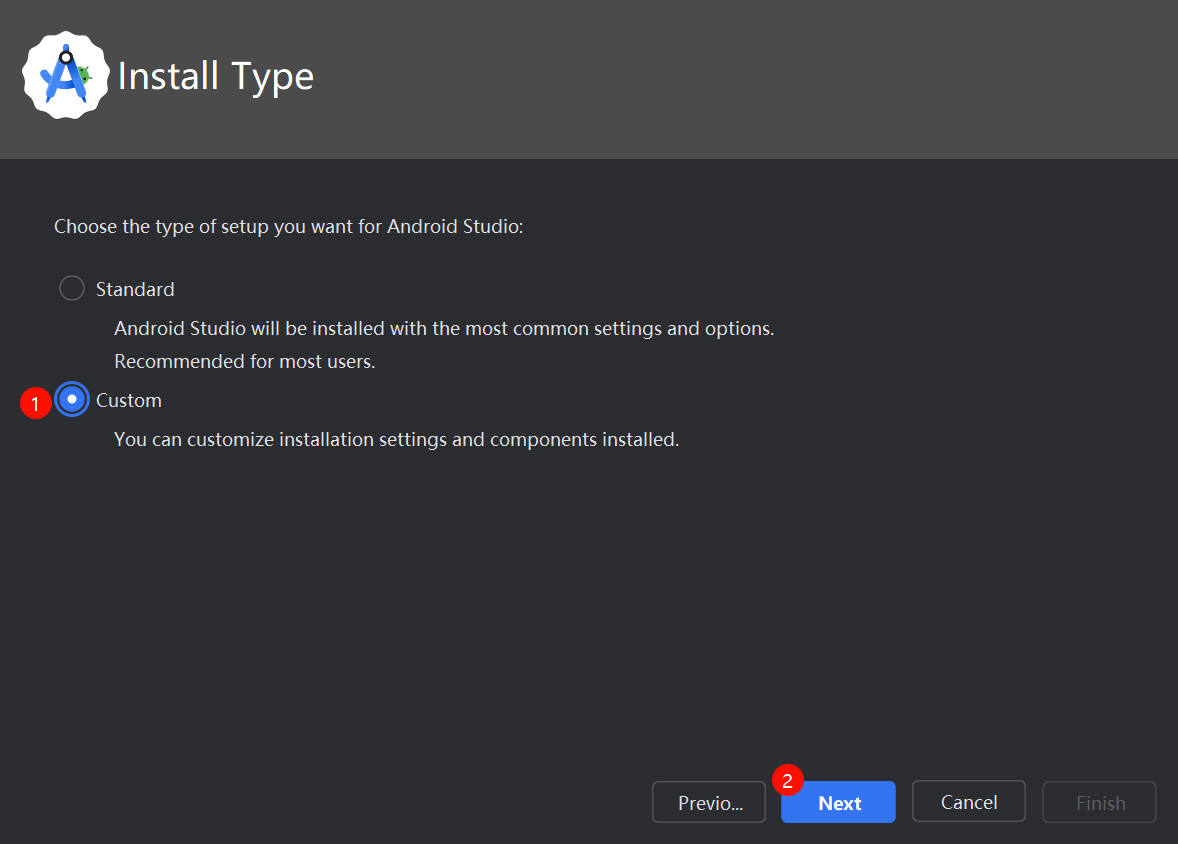
更改 Android SDK 安装路径(建议)
汉化
前往 File | Settings | Plugins
-
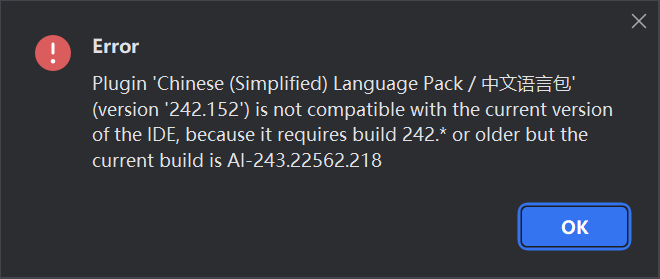
下载 IDEA 汉化插件包,手动安装。
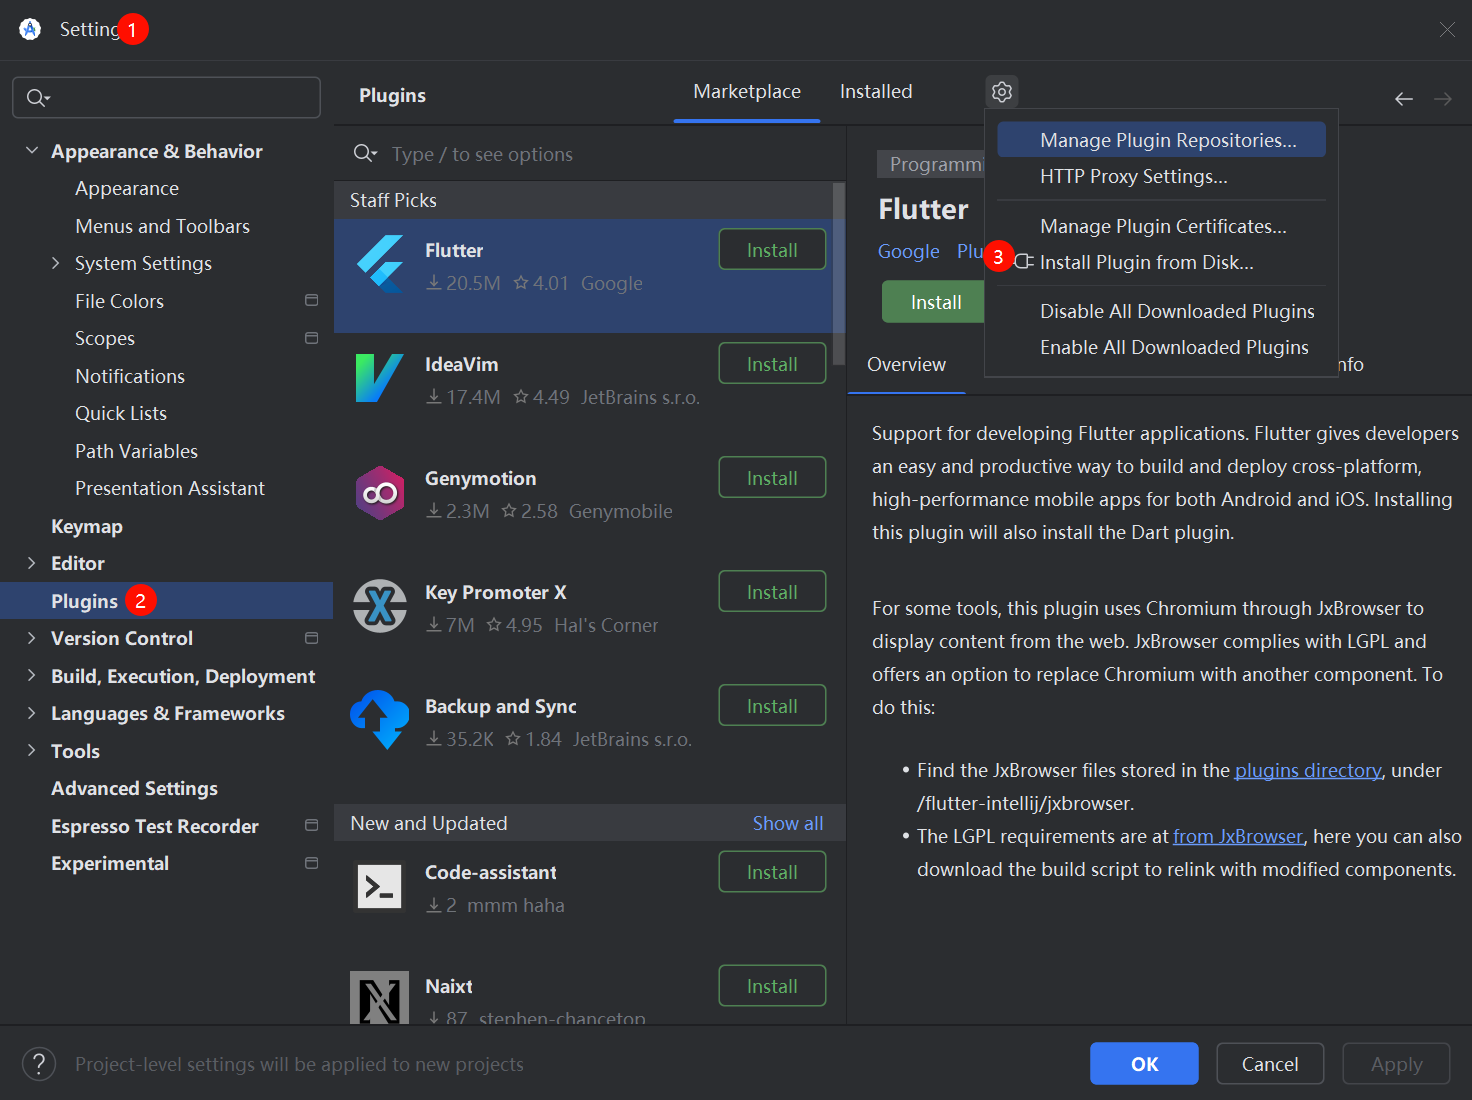
-
如果无法安装(提示版本号不匹配),到这个 GitHub 仓库上下载修改过的然后手动安装。
-
注意第三方修改版插件可能会存在安全风险。
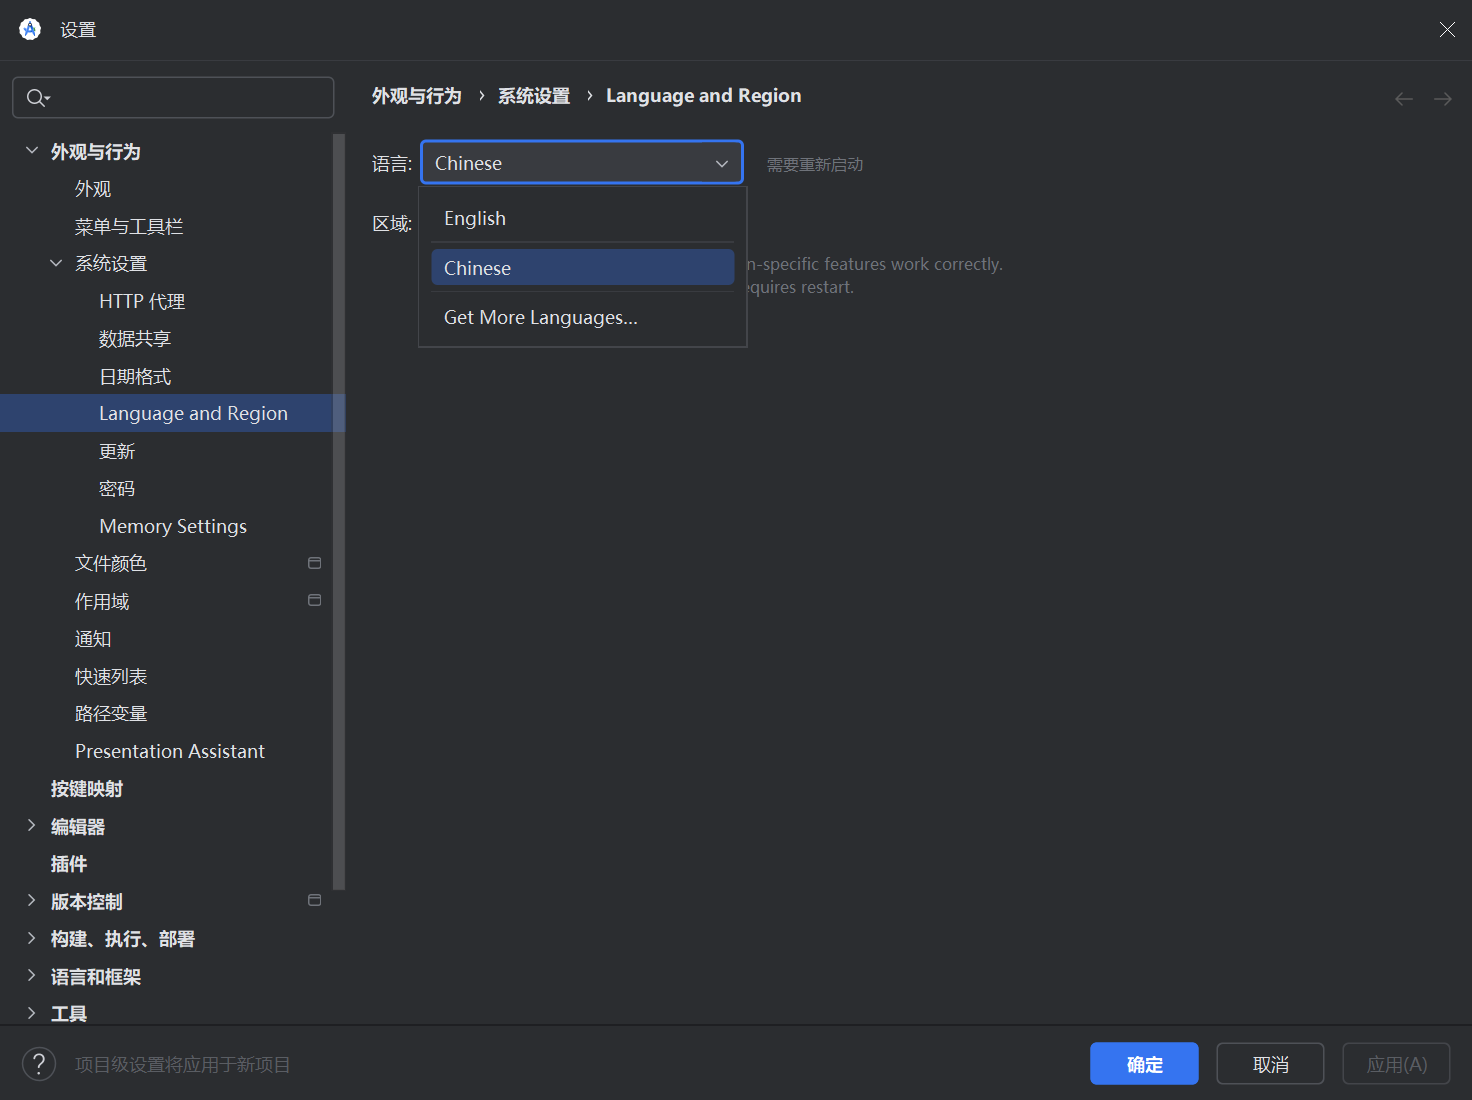
安装完成后点击 Apply,随后即可到 File | Settings | Appearance & Behavior | System Settings | Language and Region 设置为中文。
配置 Flutter 开发环境
1 | scoop install flutter |
Flutter 换源
1 | # Use flutter-io.cn $env:PUB_HOSTED_URL = 'https://pub.flutter-io.cn' $env:FLUTTER_STORAGE_BASE_URL = 'https://storage.flutter-io.cn' [System.Environment]::SetEnvironmentVariable('PUB_HOSTED_URL', $env:PUB_HOSTED_URL, 'User') [System.Environment]::SetEnvironmentVariable('FLUTTER_STORAGE_BASE_URL', $env:FLUTTER_STORAGE_BASE_URL, 'User') # Test Flutter flutter doctor -v |
可能还需:
配置 Go 开发环境
1 | scoop install go |
设置 GOPROXY
1 | # Use Goproxy.cn go env -w GO111MODULE=on go env -w GOPROXY=https://goproxy.cn,direct # Test Go go version |
或者使用 chsrc:
1 | scoop install chsrc chsrc set go |
配置 CGO
部分项目要求 CGO,请按照上文配置 C/C++ 开发环境。
配置 C# 开发环境
建议安装 Visual Studio,当然也可以继续用 Visual Studio Code。
1 | scoop install dotnet-sdk # scoop install dotnet-sdk-lts |
配置 Rust 开发环境
由于不安装 Visual Studio(MSVC),这里使用 GCC 版的 Rust。
请先按照上文配置 C/C++ 开发环境。
方法一:使用 Rustup 安装
官方建议的方式。但需要注意 Rustup 能自己管理版本,rustup update 会把自己升级,所以请先使用 Scoop 更新 Rustup。
1 | # Set Rustup mirror $env:RUSTUP_UPDATE_ROOT = "https://mirrors.nju.edu.cn/rustup/rustup" $env:RUSTUP_DIST_SERVER = "https://mirrors.nju.edu.cn/rustup" [Environment]::SetEnvironmentVariable("RUSTUP_UPDATE_ROOT", "https://mirrors.nju.edu.cn/rustup/rustup", "User") [Environment]::SetEnvironmentVariable("RUSTUP_DIST_SERVER", "https://mirrors.nju.edu.cn/rustup", "User") # Install Rustup scoop install rustup-gnu # Test Rust rustc --version cargo --version cargo new --bin rust-test cd rust-test cargo build cargo run |
方法二:使用 Scoop 安装
1 | scoop install rust-gnu |
方法三:使用 MSYS2 安装
请先按照上文配置 C/C++ 开发 MSYS2 环境。
1 | ucrt64 -c "pacman --noconfirm -S mingw-w64-ucrt-x86_64-rust" |
Cargo 换源
1 | mkdir "$env:USERPROFILE\.cargo" # Use USTC mirror @" [source.crates-io] replace-with = 'ustc' [source.ustc] registry = "sparse+https://mirrors.ustc.edu.cn/crates.io-index/" [registries.ustc] index = "sparse+https://mirrors.ustc.edu.cn/crates.io-index/" "@ | Set-Content -Path "$env:USERPROFILE\.cargo\config.toml" |
或者使用 chsrc:
1 | scoop install chsrc chsrc set rust |
配置 Ruby 开发环境
请先按照上文配置 C/C++ 开发 MSYS2 环境。
1 | scoop install ruby # Install MSYS2 and MINGW development toolchain ridk install 3 |
Rubygems 换源
1 | # Use USTC mirror gem sources gem sources --remove https://rubygems.org/ gem sources -a https://mirrors.ustc.edu.cn/rubygems/ |
或者使用 chsrc:
1 | scoop install chsrc chsrc set ruby |
配置 WSL2 + Docker 开发环境
如果您想使用 VMware / VirtualBox 等虚拟机,请不要使用此方案,此方案会启用 Hyper-V,CPU 硬件虚拟化指令被 Hyper-V 独占,会导致第三方虚拟机运行卡顿。
以下命令需要使用管理员权限执行,可以按 Win + X 打开 终端管理员。
1 | # Install WSL2 scoop install sdoog/wsl2 # Install Ubuntu (Optional) # wsl.exe --install ubuntu scoop install sdoog/wsl-ubuntu scoop hold wsl-ubuntu # prevent from updating # Install docker-desktop scoop install sdoog/docker-desktop |
安装完成后重启电脑即可使用 Docker Desktop 客户端。
换源(https://linuxmirrors.cn/ ):
1 | wsl bash <(curl -sSL https://linuxmirrors.cn/main.sh) |
Docker 换源参照 Docker安装+可用镜像收集 这篇文章。