PowerShell + Selenium 操作浏览器
PowerShell + Selenium 操作浏览器
狂犬主子PowerShell + Selenium 操作浏览器
由于本人不喜欢 Python,且 PowerShell 更能满足本人的需求,故探究使用 PowerShell + Selenium 进行浏览器自动化操作
Selenium 是一个用于自动化操作浏览器的框架,它支持多种语言和浏览器;PowerShell 是一种脚本语言,通常用于自动执行系统管理,它还经常用于在 CI/CD 环境中生成、测试和部署解决方案
PowerShell 是在 .NET 公共语言运行时 (CLR) 上构建的,所有输入和输出都是 .NET 对象,无需分析文本输出即可从输出中提取信息,可以直接调用一些C#的类库,如此处的Selenium C#
环境搭建
我们需要准备以下组件:
-
PowerShell 5.1 以上版本,推荐使用 PowerShell 7
1
winget install --id Microsoft.Powershell --source winget -
VSCode + PowerShell 扩展
https://marketplace.visualstudio.com/items?itemName=ms-vscode.PowerShell
-
已安装浏览器,这边以 Microsoft Edge 为例
-
Selenium WebDriver
安装 Selenium WebDriver
这里着重讲一下Selenium WebDriver的安装,网络上的文章都是错的:
到 NuGet Gallery 网站下载.nuget包(点击链接直接下载)
https://www.nuget.org/api/v2/package/Selenium.WebDriver
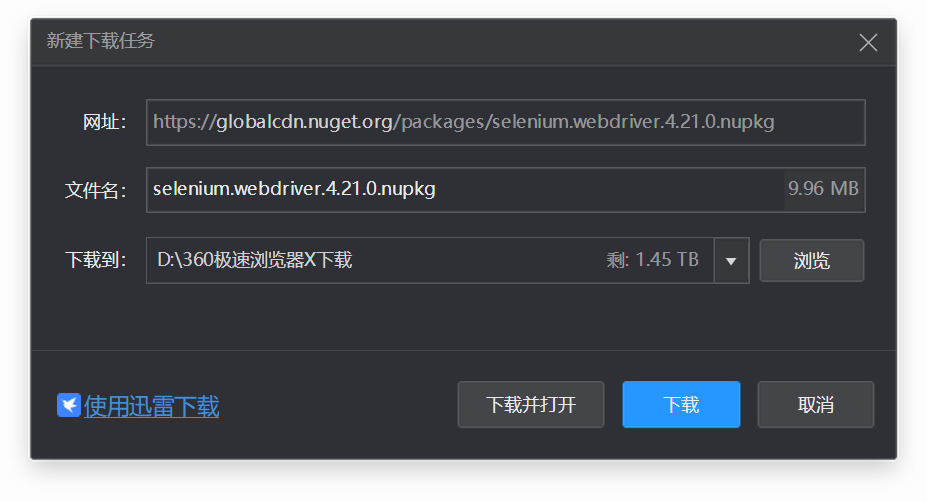
下载完成后,用解压缩软件打开
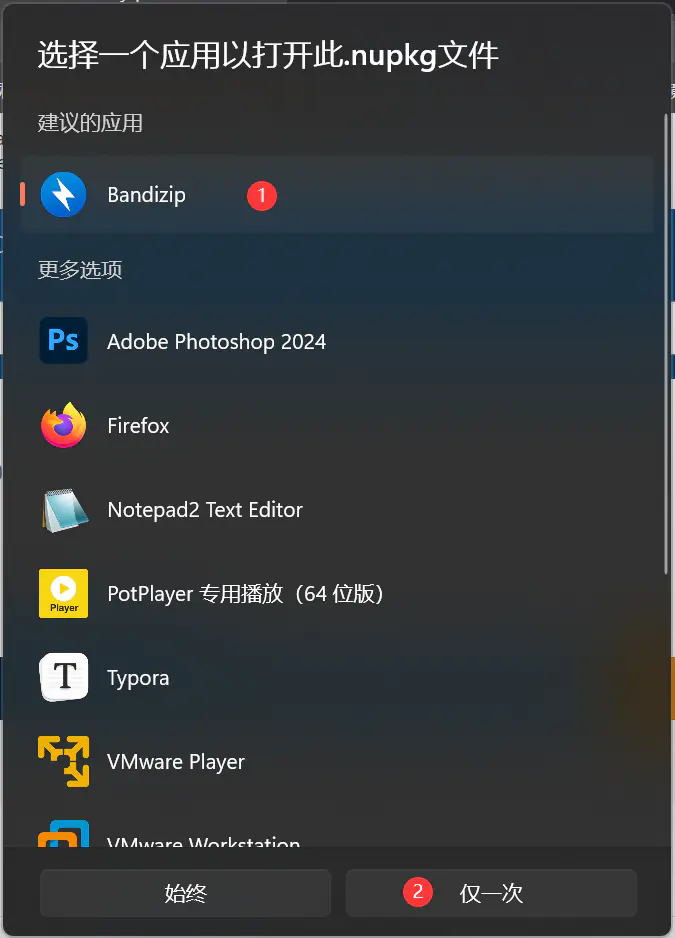
打开之后,注意不仅要解压 lib\netstandard2.0\WebDriver.dll,还要解压 manager\windows\selenium-manager.exe
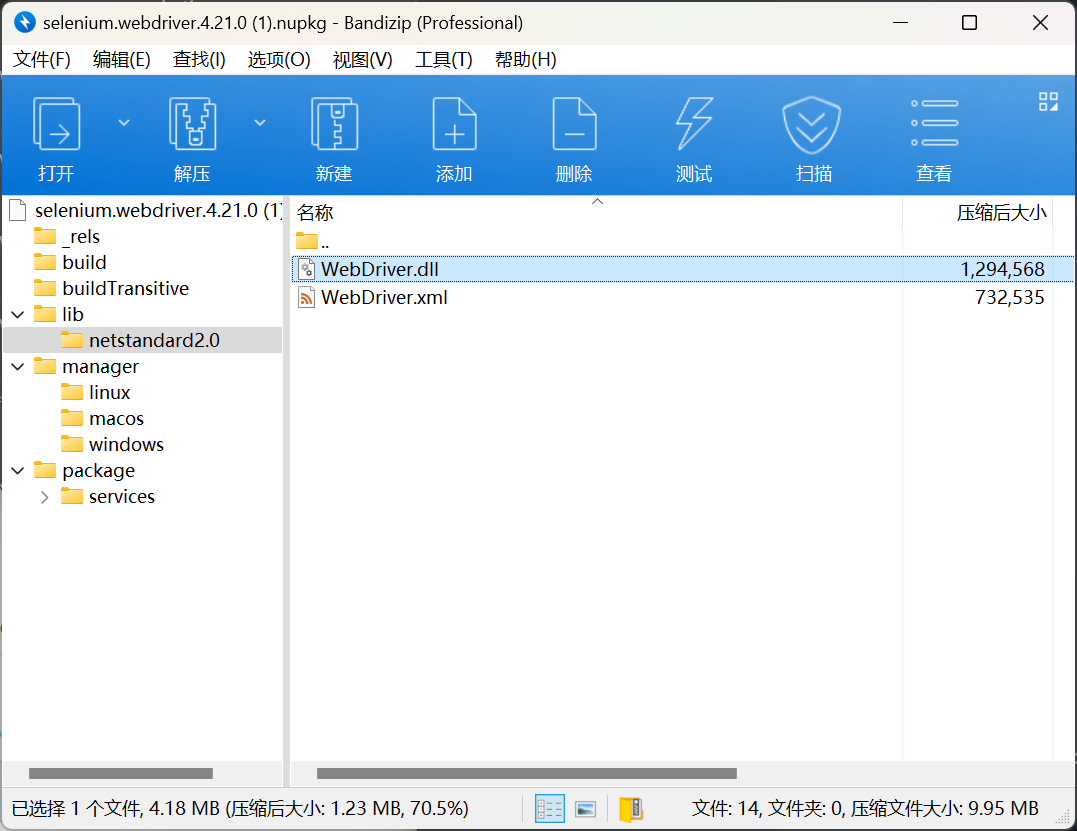
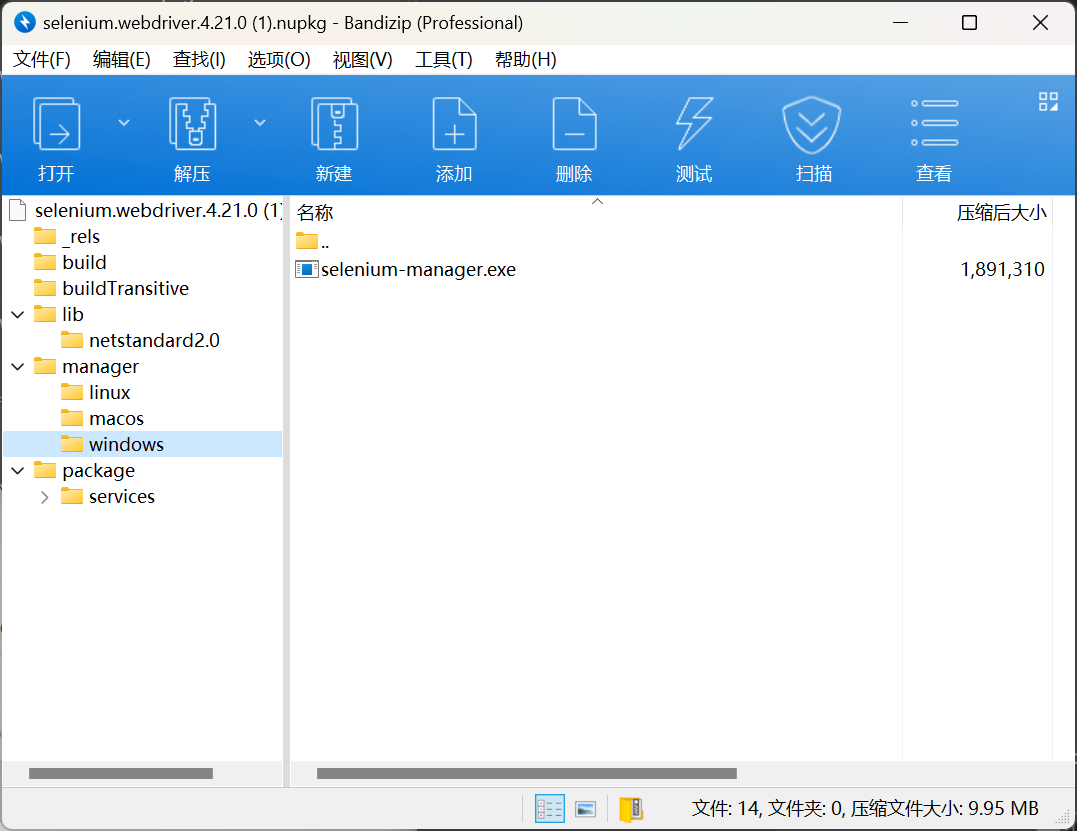

对于4.10.0及以下版本,可以不用 selenium-manager.exe,对于4.10.0以上版本,必须要解压 selenium-manager.exe,否则必报错
加载 WebDriver
首先需要创建一个脚本,如 spy.ps1,然后用VSCode编辑器打开
设置工作路径
网上的文章都说需要改 Path 变量,把 WebDriver.dll 路径加入 Path,实际上没必要这么麻烦,直接Set-Location到脚本所在路径就可以了
1 | Set-Location -Path $PSScriptRoot |
注意上述脚本必须要求为通过脚本执行,如果想要直接在命令行中执行,需要更加确切地指定脚本目录,可以这样
1 | $workingPath = "D:\dev\web" Set-Location -Path $workingPath |
当然你直接到那个目录打开 pwsh,也不是不行
关键:设置环境变量SE_MANAGER_PATH
对于4.10.0及以下版本,可以不用 selenium-manager.exe,对于4.10.0以上版本,必须要存在 selenium-manager.exe,否则必报错
程序貌似存在 BUG,会报错
1 | $driver = New-Object OpenQA.Selenium.Edge.EdgeDriver New-Object: Exception calling ".ctor" with "0" argument(s): "The type initializer for 'OpenQA.Selenium.SeleniumManager' threw an exception." |
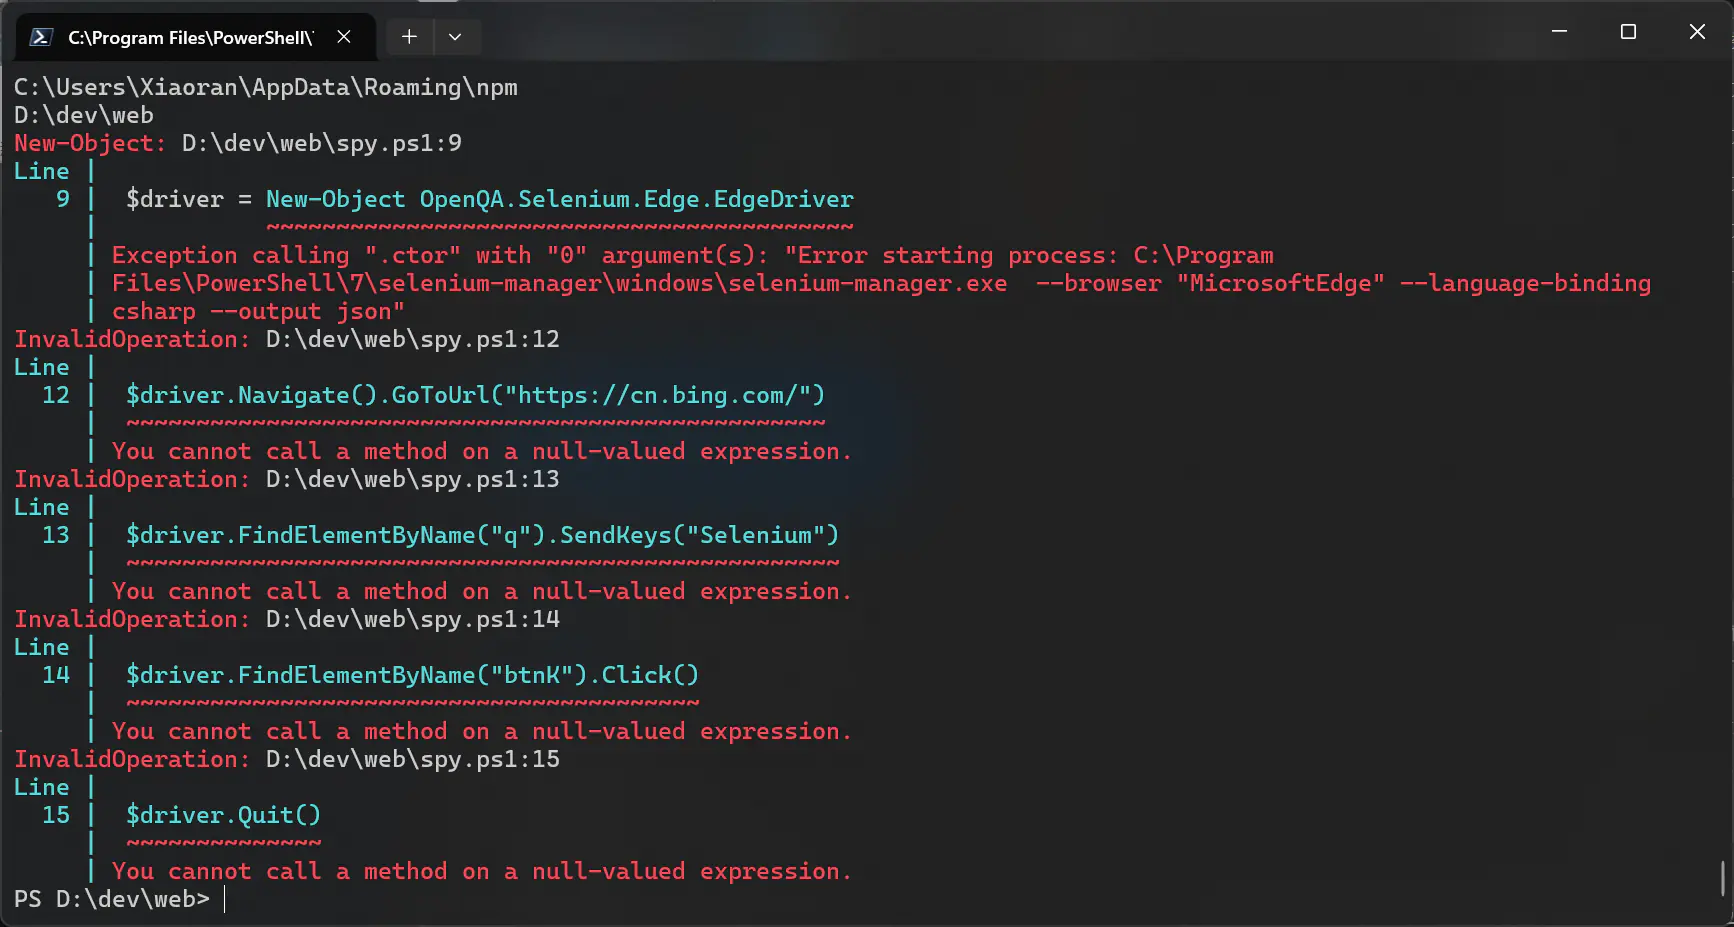
上面两个报错是因为找不到 selenium-manager.exe ,下面那个报错更明显,直接说文件在 PowerShell 安装目录找不到,就离谱
相关代码:https://github.com/SeleniumHQ/selenium/blob/trunk/dotnet/src/webdriver/SeleniumManager.cs
我们可以看到它虽然有 currentDirectory,但是实际情况下并没有生效,我们尝试过将 selenium-manager.exe 按照指定位置放置,它仍然会去 PowerShell 安装目录里面去找
有人反馈过这个问题,相关 issue:https://github.com/SeleniumHQ/selenium/issues/12564
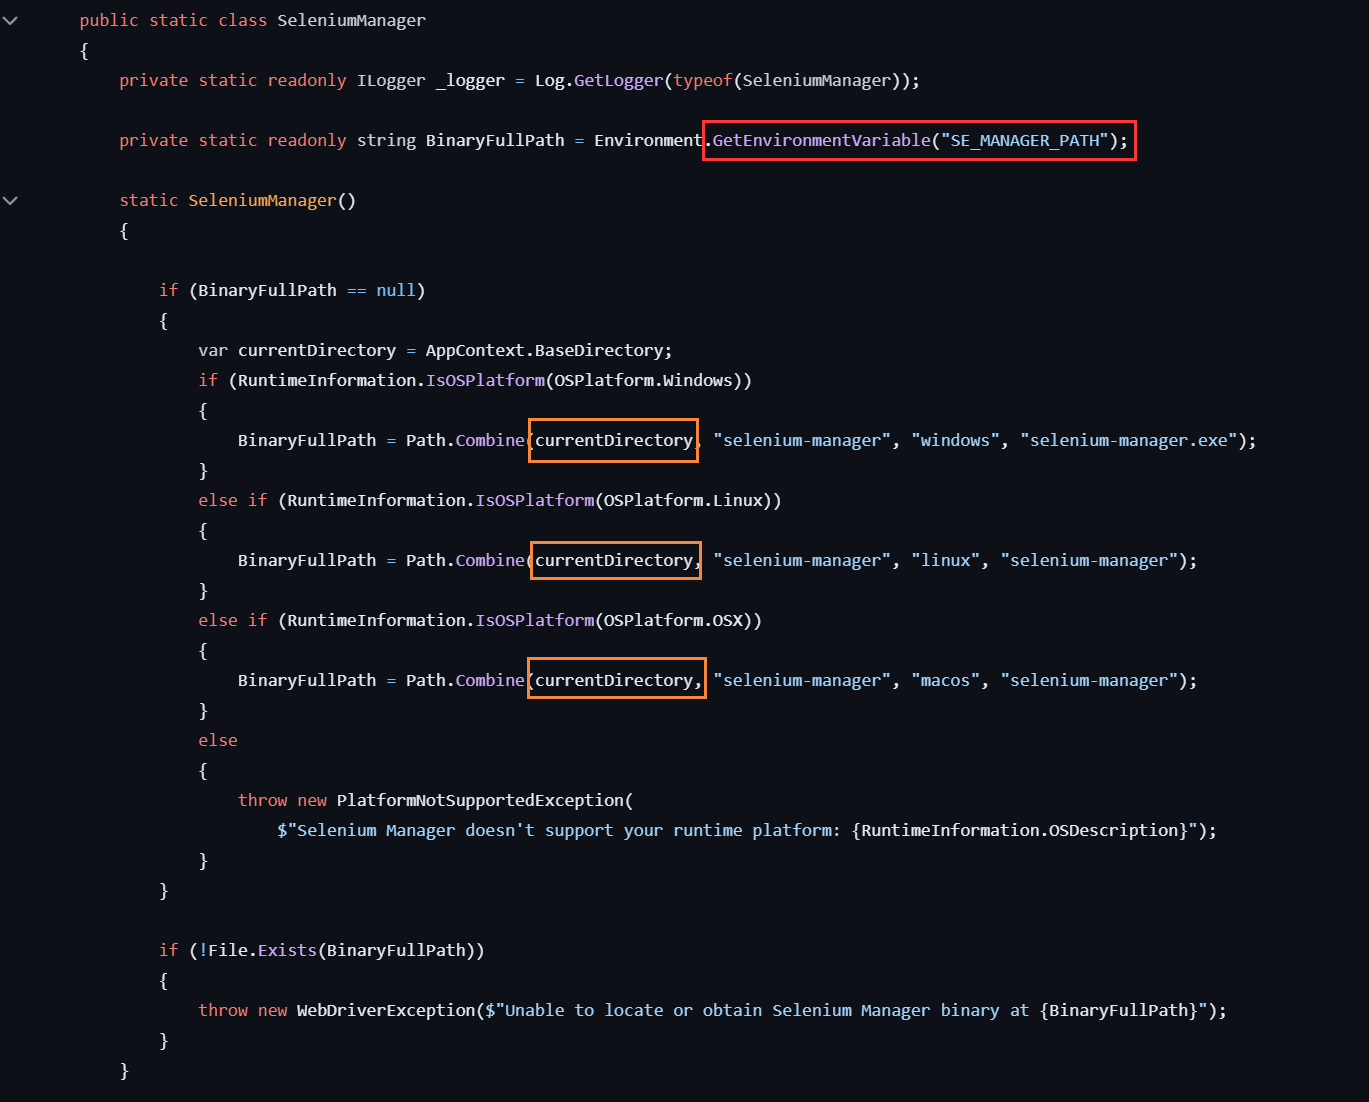
不过根据最新代码看,他加入了一个读取环境变量 SE_MANAGER_PATH的判断,所以即使它没法找到 selenium-manager.exe,我们也可以手动定义它的路径
上方内容可以忽略
1 | # 设置环境变量,避免启动失败 $env:SE_MANAGER_PATH = "$($workingPath)\selenium-manager.exe" |
1 | $env:SE_MANAGER_PATH = (Resolve-Path ".\selenium-manager.exe").Path |
设置后就不会出现报错的问题了
引用WebDriver.dll
有三种方法任意选一种即可:
1 | # OPTION 1: Import Selenium to PowerShell using the Add-Type cmdlet. Add-Type -Path ".\WebDriver.dll" # OPTION 2: Import Selenium to PowerShell using the Import-Module cmdlet. Import-Module ".\WebDriver.dll" # OPTION 3: Import Selenium to PowerShell using the .NET assembly class. [System.Reflection.Assembly]::LoadFrom(".\WebDriver.dll") |
注意我们并不需要像其它文章所说的那样,自己去下载 chromedriver.exe 或 msedgedriver.exe,因为新加入的 selenium-manager.exe 会自动帮我们下载对应当前已安装浏览器的版本,且浏览器版本不断更新,自己去管理 chromedriver 的版本是不方便的
不过可能会遇到一个问题,在国内网络环境下,Google Chrome 的 chromedriver.exe 是下载不了的,所以为了方便,我们使用 Microsoft Edge 进行演示,且 Windows 系统下已自带 Microsoft Edge
简单操作浏览器
创建实例
1 | # Edge浏览器的用法 $driver = New-Object OpenQA.Selenium.Edge.EdgeDriver # Chrome浏览器的用法 $driver = New-Object OpenQA.Selenium.Chrome.ChromeDriver # Firefox浏览器的用法 $driver = New-Object OpenQA.Selenium.Firefox.FirefoxDriver |
打开网页
这里以必应为例
1 | $driver.Navigate().GoToUrl("https://cn.bing.com/") |
输入查询
根据Name匹配 q 并执行 SendKeys 事件发送查询内容
必须键入完整的 [OpenQA.Selenium.By] 指定类型
1 | $driver.FindElement([OpenQA.Selenium.By]::Name("q")).SendKeys("潇然工作室") |
点击按钮
根据ID匹配 search_icon 并执行 Click 事件
1 | $driver.FindElement([OpenQA.Selenium.By]::Id("search_icon")).Click() |
退出实例
执行后,浏览器会退出
1 | $driver.Quit() |
应用:自动获取最新 Windows 11 23H2 x64 版本最新更新信息
1 | # 设置工作路径 $workingPath = "D:\dev\web" Set-Location -Path $workingPath # 设置环境变量,避免启动失败 $env:SE_MANAGER_PATH = "$($workingPath)\selenium-manager.exe" # 加载selenium webdriver Add-Type -Path "$($workingPath)\WebDriver.dll" # 设置 edge 启动参数 $edgeOptions = New-Object OpenQA.Selenium.Edge.EdgeOptions $edgeOptions.AddArgument("--headless") # 启用无头模式 # 启用一个新edge实例 $driver = New-Object OpenQA.Selenium.Edge.EdgeDriver -ArgumentList $edgeOptions # 访问 Win11 23H2 更新发布页面 $driver.Navigate().GoToUrl("https://support.microsoft.com/zh-cn/help/5031682") # 查找最新版本发布页面链接 $publish = $driver.FindElement([OpenQA.Selenium.By]::CssSelector("#supLeftNav > div.supLeftNavCategory.supLeftNavActiveCategory > ul > li:nth-child(2) > a")) $publishname = $publish.Text $publishurl = $publish.GetAttribute("href") # 查找catalog更新链接 # 这里用Invoke-WebRequest获取,效率更高,且避免查找错误 $catalogurl = ((Invoke-WebRequest "$publishurl").Links | Where-Object {$_.href -like "*catalog*"})[0].href # 访问catalog页面 $driver.Navigate().GoToUrl("$catalogurl") # 获取update id $catalog = $driver.FindElements( [OpenQA.Selenium.By]::ClassName("contentTextItemSpacerNoBreakLink") ) | Where-Object {$_.Text -like "*23H2*x64*"} # 筛选Win11 23H2 x64 版本 $catalogname = $catalog.Text $catalogid = $catalog.GetAttribute("id").TrimEnd("_link") # 先保存当前窗口的句柄 $initialWindowHandle = $driver.CurrentWindowHandle # 触发打开新窗口的操作 $driver.FindElement([OpenQA.Selenium.By]::Id($catalogid)).Click() # 获取所有窗口句柄 $windowHandles = $driver.WindowHandles # 新窗口的句柄应该是除了初始窗口句柄之外的一个 $newWindowHandle = $windowHandles | Where-Object { $_ -ne $initialWindowHandle } # 切换到新窗口 $driver.SwitchTo().Window($newWindowHandle) $updatelink = $driver.FindElements([OpenQA.Selenium.By]::TagName("a")).GetAttribute("href") # 结束edge实例 $driver.Quit() # 输出信息 [ordered] @{ "publishname" = $publishname "publishurl" = $publishurl "catalog" = $catalogname "catalogid" = $catalogid "updatelink" = $updatelink } | ConvertTo-Json |
输出信息:
1 | { "publishname": "2024 年 5 月 14 日 - KB5037771(OS 内部版本 22621.3593 和 22631.3593)", "publishurl": "https://support.microsoft.com/zh-cn/help/5037771", "catalog": "2024-05 Cumulative Update for Windows 11 Version 23H2 for x64-based Systems (KB5037771)", "catalogid": "a1c1095d-4024-4505-b500-10e48460b99c", "updatelink": "https://catalog.sf.dl.delivery.mp.microsoft.com/filestreamingservice/files/954d215c-85b0-41d9-8e85-04ee019234e2/public/windows11.0-kb5037771-x64_19a3f100fb8437d059d7ee2b879fe8e48a1bae42.msu" } |
参考文章
https://blog.csdn.net/weixin_45293765/article/details/123488928
